I understand that you can now use rulers with other machines - not just longarms. I believe Janome now has a ruler foot as well as rumors that Bernina will have a ruler foot soon?
I need help with ruler work - so I tracked down an Handiquilter ruler expert. Debby Brown. When I mean 'track down' - I harassed the poor lady until she gave in. Debby is a busy busy lady teaching all around the world and for Handiquilter and she does a lot of work with her local quilt shop the Quilt Basket in Pawling, NY.

Adventures in free motion quilting
Showing posts with label handiquilter. Show all posts
Showing posts with label handiquilter. Show all posts
Tuesday, March 10, 2015
Monday, February 16, 2015
If you buy one thing this year ...
... it should be a couching foot.
Save your pennies or sell an arm or a leg. This thing is so much fun it should be outlawed!! (And yes this is a non smoker, non drinker, passionate free motion quilter talking - so I have a pretty low base to what 'fun' is!)
I went through my sketch book and tried pattern after pattern.

Save your pennies or sell an arm or a leg. This thing is so much fun it should be outlawed!! (And yes this is a non smoker, non drinker, passionate free motion quilter talking - so I have a pretty low base to what 'fun' is!)
I went through my sketch book and tried pattern after pattern.
Tuesday, September 2, 2014
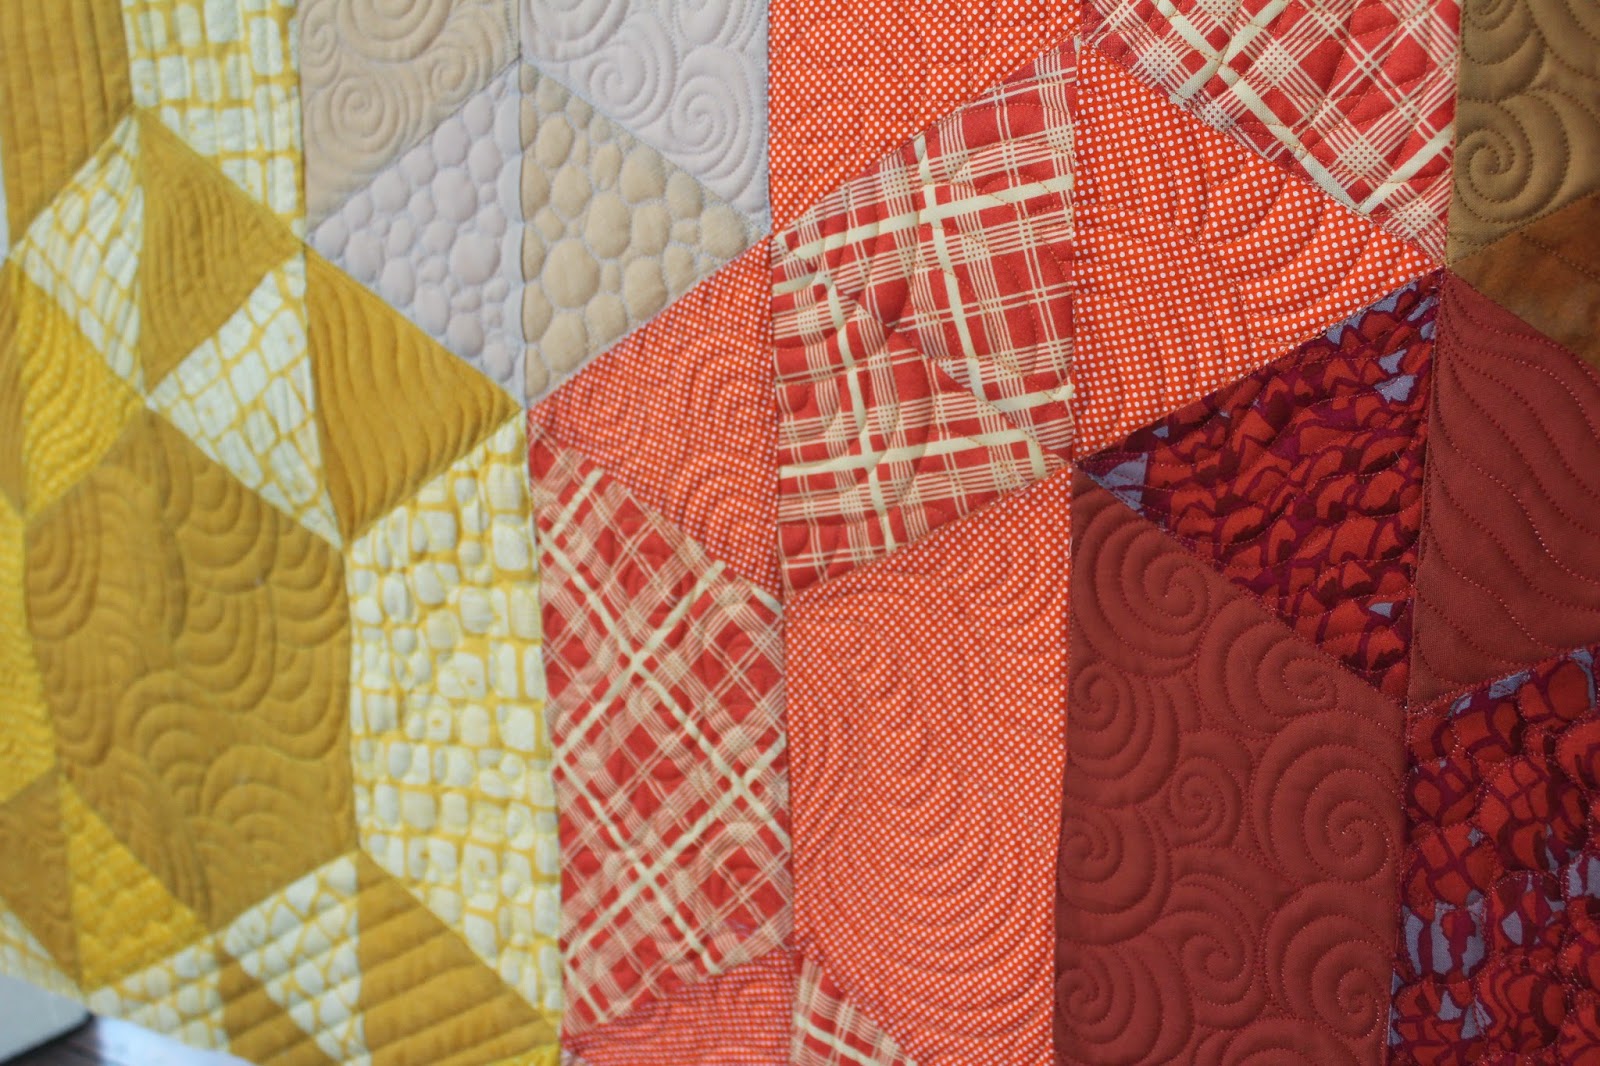
Groovy Curvy Quilt
This quilt top was put together by the lovely Maria. You can see some other of Maria's quilts here and here. Maria's quilts are a dream to work with. Her piecing is wonderful, the colors she works with are amazing and her backs and put together in a way (1/2" seam allowance pressed open) which makes me as a longarmer swoon with gratitude.

This is a quilt pattern called "Groove" by Carolina Patchworks.

The other wonderful thing about Maria's work is it is nothing like any quilt I would make - they are more modern and bold than I would ever dream to try - they are divine and they take me in new direction that challenge me to think and maybe do things that I might not do if not pushed in that direction.


Maria wanted a different design on each section (but no feathers!)

There are 17 'sections' to this quilt - so that is 17 patterns I needed to think of - and because the quilt has that sort of retro feel to it I wanted to use patterns that had a bold look to them - curves beside straight lines beside flowers etc so that each block of color complimented yet contrasted the one beside it in texture, size of design and color.

I mark very little when I quilt. The most I do is dots at each corner of a 1.5" or 2" square stencil grid (I purchased mine from the Longarm University.) The dots help me keep my designs straight & evenly spaced. I have mentioned in the list below if I mark to help keep the design on track. I use a dissolvable marker when I mark (the blue cheap as chips sort) - I use a very light touch when using them - and I keep a spray bottle of water on hand for when I have finished that area.
All these patterns are suitable for freemotion quilting on your domestic or longarm. From the top of the quilt down we have:
1) Basic Paisley/Teardrop Meander (white) for paisley ideas check out Leah Day's paisley tutorial and other ideas for the design or AQPS call this the Crybaby Meander is a very clear tutorial.
2) Checks (orange) - this design was created by making 1.5" squares with straight lines (connecting my marked dots) and then going back on the diagonal filling in every other square with something like a Cursive F pattern.
3) McTavishing (mauve) - Karen McTavish is my quilting hero - buy her books - search for her techniques on the internet. It is such a wonderful technique and looks amazing on anything.
4) Flower Power (burgundy) - I learnt this pattern in Angela Walters Craftsy class Machine Quilting Negative Space - you can also find this pattern on Pg 67 of her book. It is a surprisingly easy pattern that fills quickly and enables you to move around easily.

5) Diamonds (yellow) - diamonds made with straight lines (connecting marked dots) and then every other diamond is filled in using straight lines back and forth.
6) Echo P's (burgundy) - This is a more rigid version of a design I spotted on LuAnn Kessi's website.
7) Spirals & Pebble mix (pink) - cluster of 3 spirals together surrounded by pebbles
8) Echo Shells (white) - a trusty pleasing pattern you should definitely be in your 'go to' designs. Leah Day has a tutorial for this design too. I have found it does take practice to make it look really good - and I still feel I need to master this one. I think I will try marking with dots in future with this pattern.

(I really love the diamonds.)


9) Orange Peel (white - above) - I mark with dots for this design. (There are also some really cool variations of this design that you can play with if you are looking for something more advanced to try.)
10 Spirals (mauve - above) - spirals are great and can transform into lots of really cool designs.
11) Wavy ripples (orange - below) - LuAnn Kessi calls this design hairbands. It is a very quick and simple design to use.

12) Suns (yellow) - this is a design from Sheila Sinclair Snyder's book Get Addicted to Free-motion quilting. The design is on page 20 of the book and is called Spurs with curves. (This is a great book by the way!) This is the first time I have used this design on a quilt but I really like it.

12) Retro Flowers with pebbles (mauve) - design is adapted from a design I saw in Pg 9 of Machine Freehand Patterns by Nan Moore. This book is hard to find check out 2nd hand book stores and e-bay to snag a copy.

13) Greek Key squares (orange) - I mark with dots for this design. This design is hard - both in judging the squares, keeping the lines equal and being able to move around easily without becoming stuck. But once you have figured out the 'secret' it does get easier. I can not find a tutorial for this one - perhaps I should do one?

15) Lines (white - above & below) - My lines on Maria's quilt are softly curved. I find lines really really hard - straight or curved with a ruler or without - they are my top thing I struggle with. I do not know why people perceive lines to be easy. They are not. If you are working on a longarm you can use a ruler which will help you massively (supposedly - I must not be using mine right!). Handiquilter has a detailed presentation on rulers here.
16) Mermaid scales (burgundy) - This is an upside down and echoed version of Leah Day's Sashiko Shell. I spotted this echoed version on a recent quilt of Angela Walters that you can see here.
17) Pebbles (orange) - another great design that can take you anywhere and fill in and surround anything. There are many different ways to make a circle while free motion quilting - you should go with the way that makes most sense to you.

Would you like to see the back?


This is a quilt pattern called "Groove" by Carolina Patchworks.
The other wonderful thing about Maria's work is it is nothing like any quilt I would make - they are more modern and bold than I would ever dream to try - they are divine and they take me in new direction that challenge me to think and maybe do things that I might not do if not pushed in that direction.
I have found that I really enjoy matching threads. Superior had threads in their SoFine range that matched perfectly to the colors Maria had used.
Solid colors really show the quilting designs AND they will show every mistake you make. Patterned fabrics are more forgiving to those little mistakes you might make. If you want to start freemotion quilting - you might find that you will be more relaxed and pleased with your results if you begin by using patterned fabrics.
Maria wanted a different design on each section (but no feathers!)
There are 17 'sections' to this quilt - so that is 17 patterns I needed to think of - and because the quilt has that sort of retro feel to it I wanted to use patterns that had a bold look to them - curves beside straight lines beside flowers etc so that each block of color complimented yet contrasted the one beside it in texture, size of design and color.
I mark very little when I quilt. The most I do is dots at each corner of a 1.5" or 2" square stencil grid (I purchased mine from the Longarm University.) The dots help me keep my designs straight & evenly spaced. I have mentioned in the list below if I mark to help keep the design on track. I use a dissolvable marker when I mark (the blue cheap as chips sort) - I use a very light touch when using them - and I keep a spray bottle of water on hand for when I have finished that area.
All these patterns are suitable for freemotion quilting on your domestic or longarm. From the top of the quilt down we have:
1) Basic Paisley/Teardrop Meander (white) for paisley ideas check out Leah Day's paisley tutorial and other ideas for the design or AQPS call this the Crybaby Meander is a very clear tutorial.
2) Checks (orange) - this design was created by making 1.5" squares with straight lines (connecting my marked dots) and then going back on the diagonal filling in every other square with something like a Cursive F pattern.
3) McTavishing (mauve) - Karen McTavish is my quilting hero - buy her books - search for her techniques on the internet. It is such a wonderful technique and looks amazing on anything.
4) Flower Power (burgundy) - I learnt this pattern in Angela Walters Craftsy class Machine Quilting Negative Space - you can also find this pattern on Pg 67 of her book. It is a surprisingly easy pattern that fills quickly and enables you to move around easily.
5) Diamonds (yellow) - diamonds made with straight lines (connecting marked dots) and then every other diamond is filled in using straight lines back and forth.
6) Echo P's (burgundy) - This is a more rigid version of a design I spotted on LuAnn Kessi's website.
7) Spirals & Pebble mix (pink) - cluster of 3 spirals together surrounded by pebbles
8) Echo Shells (white) - a trusty pleasing pattern you should definitely be in your 'go to' designs. Leah Day has a tutorial for this design too. I have found it does take practice to make it look really good - and I still feel I need to master this one. I think I will try marking with dots in future with this pattern.
(I really love the diamonds.)
9) Orange Peel (white - above) - I mark with dots for this design. (There are also some really cool variations of this design that you can play with if you are looking for something more advanced to try.)
10 Spirals (mauve - above) - spirals are great and can transform into lots of really cool designs.
11) Wavy ripples (orange - below) - LuAnn Kessi calls this design hairbands. It is a very quick and simple design to use.
12) Suns (yellow) - this is a design from Sheila Sinclair Snyder's book Get Addicted to Free-motion quilting. The design is on page 20 of the book and is called Spurs with curves. (This is a great book by the way!) This is the first time I have used this design on a quilt but I really like it.
12) Retro Flowers with pebbles (mauve) - design is adapted from a design I saw in Pg 9 of Machine Freehand Patterns by Nan Moore. This book is hard to find check out 2nd hand book stores and e-bay to snag a copy.
13) Greek Key squares (orange) - I mark with dots for this design. This design is hard - both in judging the squares, keeping the lines equal and being able to move around easily without becoming stuck. But once you have figured out the 'secret' it does get easier. I can not find a tutorial for this one - perhaps I should do one?
15) Lines (white - above & below) - My lines on Maria's quilt are softly curved. I find lines really really hard - straight or curved with a ruler or without - they are my top thing I struggle with. I do not know why people perceive lines to be easy. They are not. If you are working on a longarm you can use a ruler which will help you massively (supposedly - I must not be using mine right!). Handiquilter has a detailed presentation on rulers here.
16) Mermaid scales (burgundy) - This is an upside down and echoed version of Leah Day's Sashiko Shell. I spotted this echoed version on a recent quilt of Angela Walters that you can see here.
17) Pebbles (orange) - another great design that can take you anywhere and fill in and surround anything. There are many different ways to make a circle while free motion quilting - you should go with the way that makes most sense to you.
Would you like to see the back?
Thursday, June 26, 2014
Mix and Match Quilting Designs
I love the idea of throwing lots of different quilting motifs together into negative space on quilts.

Here are two little baby quilts I put together using various different motifs. The motifs for some reason took on a beach theme. With shells, swirls, waves, pebbles, ripples and can you spot the attempt at a razor shell type shape?
The thread I used was Sahara Desert King Tut by Superior Threads - which is a variegated thread with the gentle changes of beige tones - simply gorgeous and blended into the linen like a dream. I've come a long way in 6 months from only using invisible thread to using colored threads. I'm becoming braver for sure. I'm starting to notice what some have been saying about using different threads for machine quilting.


AND the great thing about my dainty 12ft Handiquilter Fusion is that you can load two quilts tops at the same time and quilt them as you go - trimming after you have finished. You can tell from the backs that these baby quilts were loaded on side by side. I'm sure some longarm quilter is rolling their eyes at such a no no - but it worked for me .......

The strange thing for me now is when I look at the backs of quilts with utter glee - inspecting and feeling pleased with my balanced tension thinking 'wow I'm actually a real quilter'. And to me - that just seems like the most exciting thing in the world.
I could have quilted this beige on beige for ever and never have got bored. I think I could quilt white thread on top of white cotton and just be happy making endless texture on fabric .... I'm an odd type of bunny I know.

Here are two little baby quilts I put together using various different motifs. The motifs for some reason took on a beach theme. With shells, swirls, waves, pebbles, ripples and can you spot the attempt at a razor shell type shape?
The thread I used was Sahara Desert King Tut by Superior Threads - which is a variegated thread with the gentle changes of beige tones - simply gorgeous and blended into the linen like a dream. I've come a long way in 6 months from only using invisible thread to using colored threads. I'm becoming braver for sure. I'm starting to notice what some have been saying about using different threads for machine quilting.
AND the great thing about my dainty 12ft Handiquilter Fusion is that you can load two quilts tops at the same time and quilt them as you go - trimming after you have finished. You can tell from the backs that these baby quilts were loaded on side by side. I'm sure some longarm quilter is rolling their eyes at such a no no - but it worked for me .......
The strange thing for me now is when I look at the backs of quilts with utter glee - inspecting and feeling pleased with my balanced tension thinking 'wow I'm actually a real quilter'. And to me - that just seems like the most exciting thing in the world.
I could have quilted this beige on beige for ever and never have got bored. I think I could quilt white thread on top of white cotton and just be happy making endless texture on fabric .... I'm an odd type of bunny I know.
Tuesday, June 24, 2014
Working Hard
I have been working hard on a number of projects. I have five Memorial quilts that I am really excited to share with you - but not yet because the families have not yet seen them.
Meanwhile I have been trying to fit in progress on various other projects.

It is a busy month at the church this month with six new babies being baptized on a single Sunday so that is six little baby quilts. I have the top finished on Bess Beetle's quilt as well as - excited about that one. I have also finished the top for a quilt that I used Bunny #1 first fabric line with. I have a collection of really lovely quilt tops from members of my guild and beyond that I'm very excited about getting to (endless pouring over gorgeous thread colors.) All in all - I'm exhausted - totally in love with my longarm (we have been together now for 6 months!) and trying to find that balance between work, spending time with my gorgeous little ones and finding the odd moment to sit down (and yes - saying hello to the husband from time to time!)


Meanwhile I have been trying to fit in progress on various other projects.
Detail of Baby Playmat.
It is a busy month at the church this month with six new babies being baptized on a single Sunday so that is six little baby quilts. I have the top finished on Bess Beetle's quilt as well as - excited about that one. I have also finished the top for a quilt that I used Bunny #1 first fabric line with. I have a collection of really lovely quilt tops from members of my guild and beyond that I'm very excited about getting to (endless pouring over gorgeous thread colors.) All in all - I'm exhausted - totally in love with my longarm (we have been together now for 6 months!) and trying to find that balance between work, spending time with my gorgeous little ones and finding the odd moment to sit down (and yes - saying hello to the husband from time to time!)
Baby Playmat with meandering square quilting design
The quilting candy are two little baby playmats I made for the new babies being baptized. Lost blocks appliqued in the middle, fun quilting designs, recycled ribbon loops for playing with or hooking on toys.
Free hand meandering squares and triangles design
Free hand triangles are really rather hard .... but I think it looks quite cool!
Thursday, May 22, 2014
Mixing up Simple Free Motion Designs
Our guild is currently making baby quilts for charity and this was a top from Maria. Maria said that she had had this top for around a year so it would be nice to get it finished. The block is based on the Flatiron Partnership logo - which I think makes a really great block. It was such a great idea my Maria to translate this logo into a patchwork design. I read somewhere that you are a true quilter if you see a quilt in everything you see - and I don't know how many of you also walk around the world looking at things constantly thinking 'that would make a great quilt' .... my list of ideas & projects is seemingly endless these days.

As soon as I saw it and saw all the white negative space my eyes lit up. I decided to play with mixing various designs together.

The top I started off with spirals and pebbles.

A little further down the quilt I added some longer wavy spirals to the standard spirals & pebbles.
Next I added in some plain waves to the mix ...

... and finally I added some feathers (I love this row the best.)

It was a fun, quick project - and I love the result.
I hope that in the future I will be able to push this idea further and mix lots and lots of designs up together to make a really interesting texture/design - try and encourage people to look at the top of the quilt for a long time - hunt for different designs and concepts mushed in together in unexpected ways!
As soon as I saw it and saw all the white negative space my eyes lit up. I decided to play with mixing various designs together.
The top I started off with spirals and pebbles.
A little further down the quilt I added some longer wavy spirals to the standard spirals & pebbles.
Next I added in some plain waves to the mix ...
... and finally I added some feathers (I love this row the best.)
It was a fun, quick project - and I love the result.
I hope that in the future I will be able to push this idea further and mix lots and lots of designs up together to make a really interesting texture/design - try and encourage people to look at the top of the quilt for a long time - hunt for different designs and concepts mushed in together in unexpected ways!
Monday, April 28, 2014
Rainbows and a Blooming Nine Patch
I understand that the blooming Nine Patch Quilt Pattern is an easy pattern to accomplish - but one that looks utterly beautiful. Well the next quilt in the pile from Andrea just brought rays of sunshine and spring to my world.
My new years resolution was to be braver with color. I meant this more of being brave with my thread colors when quilting as I have typically only used white or invisible threads in my early quilts.
Andrea's quilts are so full of color - I wanted to take a serious plunge into color. I decided to use Rainbows thread by Superior. These are an absolutely stunning selection of threads. They have a color change every 1 inch. I do have the Superior color charts at home so I was able to select threads that blended perfectly. The actual colors of the thread do differ from the photos online quite a bit - so the color charts are well worth their small investment.

I did a swirly feathered medallion design in the middle.

... into flowers & leaves ...

... did I mention how well then beautiful thread blended? ...

.... some more serpentine lines before merging into the feather medallion in the center.


When the sun shone on the quilt the glorious texture was revealed.


Who needs a flower bed when you have this hanging in your garden?

The quilting process wasn't about its problems. Though I loved this thread and the ending result - it was really hard to use on Freddie. It kept breaking - so the initial progress was very frustrating. It led me on a crazy Google internet search into the thread to find tips on how to handle it (what did we do before Google?). This is how I handled the thread:
Tips on using Rainbow threads on your Handiquilter
- Increased my needle up to a 20 needle
- Loosen the tension on the top & on the bobbin case (Not too much though - I really spent some time playing with the tension to get it right - like 1/2 a day.......)
- Thoroughly cleaned, air dusted & oiled the machine
- I soaked the thread in water (yes - literally held it under a tap for a while) the water really seemed to help
- Don't go too fast
I feel like the thread frustration was worth the result in this case. I really hope that I get up the energy to use this thread again in future - it is SO beautiful even if it was initially a bit problematic.
My new years resolution was to be braver with color. I meant this more of being brave with my thread colors when quilting as I have typically only used white or invisible threads in my early quilts.
Andrea's quilts are so full of color - I wanted to take a serious plunge into color. I decided to use Rainbows thread by Superior. These are an absolutely stunning selection of threads. They have a color change every 1 inch. I do have the Superior color charts at home so I was able to select threads that blended perfectly. The actual colors of the thread do differ from the photos online quite a bit - so the color charts are well worth their small investment.
I did a swirly feathered medallion design in the middle.
From the edges in I started with a sepertine line on the purple border ... into feathers ....
... into flowers & leaves ...
... did I mention how well then beautiful thread blended? ...
.... some more serpentine lines before merging into the feather medallion in the center.
When the sun shone on the quilt the glorious texture was revealed.
Who needs a flower bed when you have this hanging in your garden?
The quilting process wasn't about its problems. Though I loved this thread and the ending result - it was really hard to use on Freddie. It kept breaking - so the initial progress was very frustrating. It led me on a crazy Google internet search into the thread to find tips on how to handle it (what did we do before Google?). This is how I handled the thread:
Tips on using Rainbow threads on your Handiquilter
- Increased my needle up to a 20 needle
- Loosen the tension on the top & on the bobbin case (Not too much though - I really spent some time playing with the tension to get it right - like 1/2 a day.......)
- Thoroughly cleaned, air dusted & oiled the machine
- I soaked the thread in water (yes - literally held it under a tap for a while) the water really seemed to help
- Don't go too fast
I feel like the thread frustration was worth the result in this case. I really hope that I get up the energy to use this thread again in future - it is SO beautiful even if it was initially a bit problematic.
Monday, April 21, 2014
Longarm Quilting Services
It seems that I have inadvertently started a Longarm Quilting service! I got Freddie to help me with the charity I am trying to set up 'Quilting A Memory' - so that I could quilt my memorial and memory quilts in an easier, more effective way and to a better quality.
It is true that Freddie lives in my bedroom. It is true that we are now deeply in love.
So I have decided to post some information about the cost of my longarm quilting services in the sidebar - and if you feel moved to do so - please contact me and I would love to quilt for you. 50% of all quilting costs go to Quilting A Memory. Quilting A Memory is a charity that provides free quilting services to the families of fallen/lost service men & women - making memorial & memory quilts filled with love from their clothes and or uniforms.
So to celebrate posting this - here is a quilt I just finished for a client Maria Gualdoni. Maria was so pleased with the the result of this quilt - she proudly showed it off at a recent guild meeting - which I have to admit felt really good. I hope you enjoy the quilting eye candy that follows.


And some back quilt candy.


It is true that Freddie lives in my bedroom. It is true that we are now deeply in love.
So I have decided to post some information about the cost of my longarm quilting services in the sidebar - and if you feel moved to do so - please contact me and I would love to quilt for you. 50% of all quilting costs go to Quilting A Memory. Quilting A Memory is a charity that provides free quilting services to the families of fallen/lost service men & women - making memorial & memory quilts filled with love from their clothes and or uniforms.
So to celebrate posting this - here is a quilt I just finished for a client Maria Gualdoni. Maria was so pleased with the the result of this quilt - she proudly showed it off at a recent guild meeting - which I have to admit felt really good. I hope you enjoy the quilting eye candy that follows.
And some back quilt candy.
Subscribe to:
Posts (Atom)