Monday, December 17, 2012

Nativity Pageant: Shepherds Costumes

Not much crafting is going on here - with too many small children under foot and not enough time (or energy!) But I have been able to squeeze in a bit of sewing for our local Nativity Pageant that happens every year. They needed some new shepherd costumes so I set to work using this very simple pattern. (Please e-mail me if you would like this file - it shows how to cut a length of fabric into simple shapes that then make the tunics and cloaks.)


I managed to make 4 complete costumes. 
 With frayed edges ...
 ... grommets and cord to make fancy shepherd necklines ...
 ... simple gathered slings ...
 ... and some attention to corner detail.
 I can't wait to see them being worn this year!

Happy Holidays everyone.

Wednesday, November 7, 2012

Nana's Memory Quilt

Back back in what seems like many years ago I was asked to help make a memory quilt that would be used as a chuppah for a wedding. It was such a great project to be a part of - I've been dying to do another memory quilt ever since.

Nana turned 90 this year - and it seemed like a perfect occasion to put together a memory quilt as a gift for her. Nana makes every grandchild a quilt when they are born (to remind you here is what she made for Bunny #1!). She is quite the dedicated sewer as well as a loving mother to four children, grand mother to 13 and great grandmother to an additional 21!!

Back at the beginning of this year I sent a letter to everyone in the family asking them to create a square that would be sewn together into a quilt to celebrate Nana's 90th birthday. Here is the form letter that I used in case you wanted to put together a similar project:


A Memory Quilt for Nana

In addition to all the heart felt things that are being planned for Nana's 90th birthday we thought it would be a nice idea to create a memory quilt for Nana. Nana over the years has made us all so many lovely things - lets make her a quilt packed with memories and love.

Memory quilts are quilts pieced together from squares depicting thoughts/mementos for a special loved one. They can be made from clothes, T-shirts, ties, direct printed photos - almost anything that might hold a special meaning.

If you would like to participate you will need to return any finished patch(es) or materials for the quilt BY - any squares/materials received after this date might not be able to be included in the finished quilt.

You will find in this package:
-       a square of material 14 x 14". (There should be enough pieces of material for everyone in your family plus some spare.)
-       Ziploc bag to protect your patch/material during return mailing
-       an addressed envelope for returning your squares

You can decorate your patch in anyway you wish with what ever method you wish – here are some ideas:
NOTE: you do not have to fill all of the square provided
-       write out your message with a permanent fabric marker, or perhaps penning a favorite quote or lyric that is meaningful to you and Nana
-       embroider a message or image on the square
-       use iron-on letters or pictures
-       appliqué or patchwork your own patch
-       fabric pens, paints or dye – used freehand, stenciled or stamped
-       transfer photos/drawings with heat transfer paper or printable fabric sheets.
-       buttons, beads, ribbon, lace

You do not have to fill the square provided - you do not have to use the provided square of fabric - you can:
-       use any other fabric you might prefer
-       return a piece of fabric/clothing that has meaning to you that you would like to be included
Please feel free to be as imaginative as possible and take your square any direction you want. Thank you so much for your participation in this project.

Any questions please contact me @


It was such a fun project - I really enjoyed putting it all together.

I quilted the huge beast on my Bernia which was quite an undertaking - it isn't perfect - but I think Nana was pleased with her gift. 

 Here are some of my favorite squares ...


Wednesday, October 10, 2012

Baby Bunny #3

Our first boy (Baby Bunny #3) arrived safely but in a bit of a hurry on August 27.
We are all doing really well - but I have a serious lack of free time and hands dealing with 3 little bunnies 3 and under!!

Thursday, August 9, 2012

I've Been Knitting Away

I have been working away on two large and secret projects.

This is one of the projects that was knitted in secret. I finally finished it and was able to post it to the UK last week. It is a wedding present for my sister who got married at the end of June this year.
 
The blanket is huge (her husband is quite tall) - the blanket measures 6.5ft x 7ft.
It is a much larger version of a baby blanket I made back in November '09. The border is another continuous cable border with 3 simple rope cables in it.
In the bottom right hand corner of the blanket there is a cable heart (adapted from a book I love - Continuous Cables) and in the heart (after much experimentation and pondering) I added some cream felted wool in their initials combined over a heart.
I used Cascade Ecological Wool in Natural. I love this wool - it is soft, easy to knit with and the hanks are just enormous. Now I just need to write the pattern down! I'm so glad I finished the blanket before the new baby arrives - the other project will have to be completed in a haze of new born madness ...

Tuesday, May 29, 2012

Tutorial: Bunting

I have posted a tutorial about bunting before back in January of 2008. It has been a while since I have made bunting but Bunny #1 has a school fair coming up and I offered to make bunting for the event.
They requested rainbow bunting - I made 5 reams of approx 30 yards (90 feet) each (total 150 yards/450 feet). Bunting is so easy to make - and such an effective decoration - I wanted to update my tutorial with what I learnt this time.

Simple Bunting
You will need:
  • Triangle template and pinking sheers
  • OR 
  • Ruler and rotary pinking blade (for large amounts of bunting I highly recommend investing in a ruler and rotary pinking blade)
  • Bias tape (I make my own - you can make yards and yards of it very easily and cheaply)
  • A selection of pretty fabrics
  • Cotton for sewing
1) Cut flags using a template and pinking sheers OR
Cut flags using your ruler and rotary pinking blade.
Fabric typically comes in widths of 44-45". Fold your fabric in half and lay it on your cutting mat. With a standard (straight) rotary blade cut the fabric into strips 8.5" wide. Then using your pinking rotary blade cut the 8.5" strips into triangles as per the diagram below. Each 8.5" strip of fabric should yield you 11 flags in total. The end 6th flag cut on the fabric fold will have to be unfolded and trimmed to the correct size. If you layer your folded fabric (I cut 3-4 fabrics at a time) you can make hundreds of flags in next to no time.
 
Note: I did not remove the selvages from the fabric first - any selvage visible on the tip of the 1st & 11th flag was covered up by the bias tape.

2) Fold the bias tape and sew at least 14"+ of the bias tape together before adding any flags. (This will ensure you have enough tape on the end of the bunting to tie it up)

3) Add the flags one by one leaving the same spacing between each flag. For indoor bunting you can leave a smaller space (approx 1"+) between flags. For outdoor bunting you can leave a larger space (approx 3-4") between flags.


Note: I used a plain straight stitch - but you could use a decorative stitch if you wanted to.

3) Ensure you leave at least 14"+ of the bias tape without any flags at the end of the bias tape too!

4) Give the bunting a firm press with a steam iron. If you have a large amount of bunting you might want to wrap the bunting around a wide piece of cardboard to keep it flat.

Info about this project: I used 2 yards each of 7 different fabrics to make all the flags. The red, purple and yellow fabrics were all plain cotton broadcloths, the green fabric was Goodnight Spot Stars Green, the violet fabric was Michael Miller Mini Mikes Tiny Gingham Purple, the orange fabric was Michael Miller Apothescary Spooky Spots Pumpkin and the blue fabric Nursery Rhymes Stripe Royal Blue. I tend to buy most of my fabrics from Fabric.com. All the flags cut from this material required approx 5 more yards of fabric made into bias tape. This yielded approx 150 yards+ (450 feet+) of bunting.

Wednesday, May 23, 2012

Lemon Recipes

What is it about lemons that makes you feel summery? Their refreshing scent? Or their bright sunny appearance perhaps? Here are two recipes you shouldn't be without this summer.

Lemon Yogurt Cake from Bon Appetit
While this cake is baking make a lemon syrup - 1/3 cup lemon juice with 1/3 cup sugar - heat over a low heat until sugar is dissolved. As soon as you pull the cake out of the oven use a skewer to make holes all over it and pour the lemon syrup over the loaf - leave until cooled before taking the cake out of the pan. I like to serve this loaf with heaps of summer berries on the side. This cake is so delicious - perfect for afternoon tea, or a desert or as a breakfast bread. I have also used orange instead of lemon and this worked really well too.

Paula Dean's Lemonade
I have always been a skeptic of homemade lemonade - but this recipe seems to be a big crowd pleaser. The kids love it as do the grownups - and certain men have been known to mix it with beer to make it into a summer shandy ... I still find the recipe to be too strong and sugary - but I fill up drink dispensers or jugs with ice, sliced limes and sometimes some mint before adding the lemonade mixture. The drink seems to get better as the ice melts. Yesterday bunny #1 and I made a huge batch and put portions into the freezer - we are officially ready for a sunny afternoon in the garden!!

Friday, May 18, 2012

Websites and Your Privacy

I would say that I am a pretty private person. My blog is about as 'out there' as I get. Recently I discovered that my name and contact information (personal e-mail, a former address & cell phone) was out there in the public view and available for anyone to access because I own a url/domain (www.rachaelrabbit.com). I was told by my website provider that there is a public database called 'whois' - this tells anyone who wants to know the current contact information linked to a website/domain name (there are many search engines that access this database - if you want to check your/a url I was referred to this search engine http://www.betterwhois.com/.) For a small fee (of course) I could have this information blocked - but it shocked me to know that my information was/has been so easy to access. I have recently been receiving a huge increase in all sorts of spam - both via e-mail and on my phone - this easily accessed information must explain some of this. I just wanted to post this information in case you have a website and have not had your personal information blocked by your host - perhaps you want to consider doing this too.

Wednesday, May 16, 2012

Art Smocks in Action


Just a very quick post. I have much to share and seemingly not enough hours in the day ...

Here is a picture I received of my most recent art smocks in action.
 
How cute? 

Thursday, April 26, 2012

Scrappy Sleep Sack

In a moment of distraction from my current 'to do' list - I made this scrappy Sleep Sack for a little baby girl. It was a really easy project. I used left over strips of pink fabrics, remnants of quilt batting for the padding and some white cotton flannel that has been lying around begging to be used for years. I think the only thing I had to buy was the zip. I feel this would be a good project to make from recycled cotton shirts as well.
 
(The sleep sack is really quite cute and I feel frustrated that the photos don't do it justice - every wrinkle is highlighted - in real life it doesn't look at all wrinkled - it looks soft and cosy. Does anyone have any photography tips for taking pictures of fabric?)

I added little scrappy details - patches embellished with embroidery thread. 
I have often found zips are hard to put in - but this one went remarkably well. The binding is a cosy purple flannel. I always hand finish my bindings.

I've also been waiting for the delivery of some net curtain wire to hang curtains for the playhouse outside (thank you Sue for your suggestion!) I wasn't able to find any net curtain wire in the US - so I got it from an e-bay shop in the UK. The curtains are made from 2 yards of cotton I got years ago but never used - I don't think I ever liked the pattern but I think it works well for the little house.
Slowly but surely I'm working through my stash of fabrics!

Monday, April 16, 2012

Baby Girl Playmat

Another project finished and my first photos outside this year! I had forgotten how bumpy grass can be for photos! A little quilted play mat for a baby girl. I added some tags in the top corner to hook those little baby toys to. This quilt is made from the scraps left over from my scrappy Valentine Quilt (yet to be quilted - that is still on the list of to-do's.) I haven't done any free motion quilting for a while - but I didn't feel too intimidated tackling this piece.
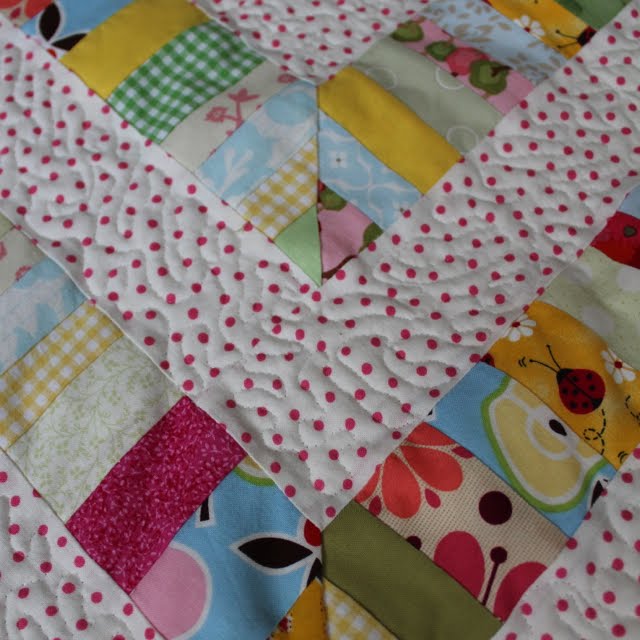
I hope it will be enjoyed by the little lady who is due to arrive soon.

Thursday, April 12, 2012

Smocks for Sisters

Two art smocks for two sisters. The fabric is Soleil Laminated Cotton Rose. Edged with a purple cotton and orange ribbon ties. I cut the pocket details from felt.
It feels good to finish some projects! Next in the art smock series ... I want to try sewing with some poly laminate - it certainly isn't as nice as the lovely cotton laminates you can find - but the price point is unbeatable. Has anyone sewn with poly laminates before - I'd love any tips you might have.

Monday, March 12, 2012

Lollypop Cupcakes

Busy weekend for us here. Birthdays (mine and Bunny #1's) and our wedding anniversary (7). To help Bunny #1 celebrate her 3rd birthday I made some cupcakes for her class. I saw this idea from Martha Stewart Cupcakes. I couldn't find the neutral colored sprinkles and I wasn't sure what taffy tape was ... so I just used cream cheese frosting and made the leaves from icing sugar and water.They were so easy to make and apparently quite popular at school with kiddies and teachers alike!
Hope you all had a good weekend too.