Monday, May 27, 2013

Memorial Quilt: Fallen Soldier Quilt

I finished the quilt from the soldiers uniform.


There is so much I want to say about this project. But I'm finding it hard to get the words out.


The quilt fits a full or queen bed. I made a label for the back which I framed with the camouflage material and decorated with the uniform buttons - I am not showing this label the information seemed too personal. I also made a little fairy for the daughter. 


I put a lot of effort into the details. Matching my seams, free motion quilting and some fancy corners. 


I really hope that the family enjoys the quilt. I feel truly honored to have been able to do this project for them. 


***********

Please do not forget about the charity I Spy quilt - we are still looking for scrap fabric donations. 

Tuesday, May 21, 2013

Recycled Teepee

When a friend of mine pointed me towards this tutorial on A Beautiful Mess about how to make your own teepee - I jumped at the opportunity to whip one up. I was amazed how quickly this project came together - but also the size of it - it is much bigger than I had thought it would be!


Before we moved into our house the previous owners had lived here for 45 years. I don't know if they had the same curtains for that period of time - but we took every curtain down. I washed kept some white 'cotton' eyelet curtains for a potential craft project. This material has now been sitting in a box for 3 years - hurrah - a purpose and confirmation of my belief that one should never throw material away.


I had to amend the tutorial slightly (my teepee is slightly narrower by 2" at the base) as I had a limited amount of material to work with.

Some of the material was damaged - but I just had to embrace the frays and nicks in some places.


I constructed the front panel differently from the tutorial. The front panel is a triangle at the top and then two gentle ruffled curtains with more abundant ruffles at the base of each curtain. I had some fabric scraps left over from the project and not enough length in the curtains so I sewed all the left overs scraps together and ruffled them - I think the ruffles hide all the seams well.


I carefully trimmed and saved some of the scalloped edges to make the curtain tie backs.


Inside the teepee I sewed 3 ties to each seam. One at the top, in the middle and at the bottom. I used ribbon that was left over from our Princess Tea Party - but I think you could use anything that can be tied tightly without ripping.

Instead of using 2x1 lengths of wood - I opted for a pricier round 1 3/8" wood molding poles (8ft lengths). Personally I think they were worth the extra cost.


The teepee will be mostly used outside but I did put felt pads on the bottom of each pole. Despite sanding the base of each pole before hand - I was worried that the poles would scratch or mark the floors when we played with it inside.

I made a mat for the tee pee out of an old wool blanket I purchased on ebay for $18.26 (that price includes the shipping.) Ebay is an excellent source for finding recyclable materials. Once I had reminded myself of the basic geometry of a perfect triangle I began cutting and constructing my hexagon blanket. I even reused the binding of the original blanket on the edges. I might decorate this blanket in a cute way at a later date.


I hope this will inspire you with your own tee pee! The Land of Nod & Magic Cabin have lovely teepee's for sale. And if you would like to make a smaller scale teepee here is the cutest little teepee on LoLovie her teepee is made from a tutorial on Pink Toes and Power Tools.

Thursday, May 16, 2013

WIP: Recycled Sweater Union Jack Blanket

I know - you have heard it from me before - but I save everything. Old shirts, sweaters, ties, blankets, curtains, any kind of fabric swatch or scrap - you name it - I have a box with 'stuff' in it waiting for a suitable project. Sometimes I wonder if I have a hoarding problem - but my husband has yet to arrange an intervention!!

This post is about a quilt I am creating out of recycled sweaters. 


For this project so far I have used 3 sweaters (they would be called jumpers in England!) A wool red fair isle sweater, a blue & white striped wool sweater and a small amount from a plain blue wool sweater. I washed the sweaters on the hottest setting possible in my washing machine and then tumble dryed them on hot. After that they were good and ruined for any possible wearing and quite felted!
 
I deconstructed the sweaters carefully and ironed each piece. Then I used 505 spray to stick them on scrap pieces of cotton. I was careful not to stretch out the pieces when laying them on the cotton. (This particular piece of garish green cow emblazoned scrap cotton was from a pillowcase I made my sister some years back - pillowcases make cute gifts and can be made out of all sorts of novelty prints.)


The cotton enabled me to cut perfect squares (2.5" each) and they have stayed in perfect squares while I have been laying out the design. I am going to keep the scrap cotton on the back of the squares when I sew the pieces together.


This is the beginning of my recycled sweater blanket. If you know what the design is going to be I've succeeded so far. Now to sew it all together! 

Ouch - I've spotted a mistake ... do you know what it is? 

Here is my design. Each square is 2.5". (I can e-mail you a larger excel file if you are interested.) It could be used as a patchwork design or base for a knitting design too.


Here we are - mistake all corrected and the first part of the blanket sewn together. 


I'm a lover of different textures - and I used every bit of each sweater - ribbing and all. 


The wool hasn't stretched or warped during the sewing due to the cotton on the back.  


Of course everyone likes to stand on things when Mummy is trying to photograph them. 

Looking forward to finishing this blanket/quilt. I will post once it is completed.

Thursday, May 9, 2013

Easy Silk Scarf Dyeing with Tissue Paper

Mother's Day is coming and we have been thinking about things we could make for Grandma. With our recent success in dyeing play silks I decided to take the success of our tissue paper dyed play silk and decorate a silk scarf for Grandma with tissue paper pieces.


I had one white silk scarf left. A pile of tissue paper (some new, some recycled) and two paper punches. The white one is Martha Stewart butterfly punch and the black one is an EK slim flower paper punch

Once we had punched all our shapes we collected the tissue paper pieces in a bowl we prepared our silk. The silk is soaked in water and a glug of vinegar. I laid the silk out as flat as I could on the floor on top of a large black plastic bag - for photographic purposes I wish I had thought of something a bit more aesthetically pleasing!


We began placing the tissue paper shapes. Flowers in the corner and butterflies all over the rest of the scarf.


It didn't matter if the tissue paper pieces were not put on perfectly the wet scarf helped them stick. 


It was such a kid friendly and easy activity for my 4 year old.

Once all the tissue paper shapes were put on our scarf we left the tissue paper to do its magic. 


After 1.5 hrs I took the wet tissue paper off the scarf, rinsed the scarf on a 20min cold machine cycle and then dried the scarf on our highest setting in the tumble dryer. 

Where two pieces of tissue paper landed together the colors and shapes are cute. 


The scarf is quite pretty. Some of the tissue paper dye did bleed a little - but as there is no strict pattern - I'm hoping it adds charm and movement to our little handmade gift. 


Wishing you all a very happy Mother's Day this weekend. 

Tuesday, May 7, 2013

Kid Friendly Dyeing - Making your own Play Silks


I have wanted to make some play silks for the girls for a long time.  Play silks can be used in a multitude of ways in creative play to stimulate a child's imagination. They can be used as blankets, for dress up, for doll play, in dance, flags & forts etc If you don't have time to make your own silks and just want to buy them these websites will help you Sarah's Silks or Magic Cabin.


I wanted to be able to make the silks in fastest possible way which was kid friendly and non toxic. I googled about Kool Aid dying, winged it with the Easter Egg Dye and used the information here to experiment with tissue paper.


To see if these dying methods would succeed or fail I also made a sample without the kids using Tulip fabric dye. Here are the results.


Kool-Aid (powder) (Tropical Punch - Dye Red 40)
- Soak silk in hot tap water with a glug of vinegar while you make your mixture.
- Mixture: We used 2 package of unsweetened Kool-Aid with 12 ounces of hot tap water + 4 ounces of vinegar.
- Squeeze water out of silk and place silk in a pyrex bowl with the kool aid mixture.
- Microwave for 2 mins - stir and let sit for 2 mins - do this step twice.
- Rinse in cold wash (no detergent) & dry on hottest cycle in tumble dryer.
Comments: There was some mottling on the fabric - perhaps this is just a product of microwave dying but I suspect if we had used 3 packets of Kool-Aid with 18 ounces of hot tap water + 6 ounces of vinegar so the silk was submerged at all times - this might have yielded better results.

Kool-Aid (Liquid) (Tropical Punch - Dye Red 40)
- Soak silk in hot tap water with a glug of vinegar while you make your mixture.
- Mixture: We used 1 liquid Kool-Aid with 12 ounces of hot tap water + 4 ounces of vinegar.
- Squeeze water out of silk and place silk in a pyrex bowl with the kool aid mixture.
- Microwave for 2 mins - stir and let sit for 2 mins - do this step twice. - Rinse in cold wash & dry on hottest cycle in tumble dryer.
Comments: My girls really enjoyed squirting in the liquid. The mess was much more contained than with the powder sachets. The sugar in the liquid did not seem to affect the success of the dying - although the color is lighter. Some mottling - again I think we should have used more liquid.

Easter Egg Dye (McCormicks Assorted Food Colors & Egg Dye - Red 40)
- Soak silk in hot tap water with a glug of vinegar while you make your mixture.
- Mixture: We used about all I had left in the bottle (maybe 1/2 to 3/4) with 12 ounces of hot tap water + 4 ounces of vinegar.
- Squeeze water out of silk and place silk in a pyrex bowl with the mixture.
- Microwave for 2 mins - stir and let sit for 2 mins - do this step twice. - Rinse in cold wash & dry on hottest cycle in tumble dryer.
Comments: SO excited by the bright and even color - I tried this process without heating the liquid in the microwave because I wanted to find the most kid friendly process to dying these silks and IT WORKS!!! Here is my amended recipe:

Food Coloring or Paste/Gel.
- Soak silk in hot tap water with a glug of vinegar while you make your mixture.
- Mixture: 1/2 bottle of 0.25oz food coloring with 16 ounces of hot tap water + 6 ounces of vinegar.
- Squeeze water out of silk and place silk in a pyrex bowl with the mixture.
- Leave it there and stir occasionally - you will see when the dye has been absorbed as the liquid will become a lot clearer - approx 20 mins.
- Rinse in cold wash & dry on hottest cycle in tumble dryer.

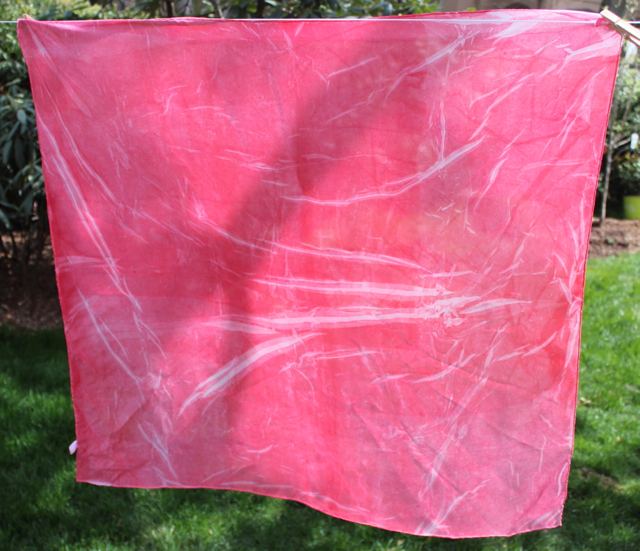
Here is my pink, purple (a disaster - totally my fault), blue, yellow & green using this method.


Comments: I did notice the water did still not run clear in the washing machine after the rinse cycle. So perhaps the microwave method does produce a more colorfast product. However for ease, safety etc for dying with the kids this still by far is my favorite. Different types of food dyes did produce different results with mottling, color flecks etc.

Tissue Paper (7 sheets of red tissue paper)
- Soak silk in hot tap water with a glug of vinegar while you make your mixture.
- Lay out some glad wrap or cling film and put sheets of tissue paper 2 layers thick on top of some glad wrap or cling film - 2 layers thick. Lay your wet silk on top as flat as possible.
- Lay more sheets of tissue paper on top of your silk. We used a total of 7 sheets of tissue paper - 2 layers underneath 1layer on top.
- Sprinkle some of your water & vinegar solution on top of the tissue layers & silk.


- Fold the tissue layers in half, in half again and in half again. Squeeze and massage all the layers together for some time. (My little one enjoyed dancing on top of the package instead!)


- Leave for several hours - we left ours over night. 
- Undo your package, peel off the tissue paper.
- Rinse in cold wash & dry on hottest cycle in tumble dryer.


Comments: I liked this a lot - for the fact that it is totally kid safe, the most interactive, tactile, no hot water or microwave is needed. However the process did take the longest. The pattern where the fabric didn't touch the tissue paper looks kind of cool. I think you could make some really interesting designs/drawings with the tissue paper too. Maybe we will try that next.  

Tulip Liquid Dye (Red)


Comments: The most disappointing result by far - mainly because of the color - it is not red - I think it is orange. Granted I didn't fully follow the instructions on the packet - they didn't have instructions for use on such a small amount of liquid/material. I'll be returning the other dyes we purchased and have not used in this line. 


Further Notes: After all the silks were dry I used a hot iron on each silk. I used a front loading Electrolux Washing Machine which has a 20 minute cold rinse cycle without a spin. I used a front loading Electrolux Tumble Dyer that has a 14min 'fast dry' cycle which is at its 'sanitize' heat level (hotter that a hot cycle.) I purchased our plain silks from Dharma Trading they are 35"x35".


I hope this helps you make your own play silks at home too.

Monday, May 6, 2013

Cherry Blossom Tulle Pom Poms


We had a birthday party at the weekend so I made some tulle pom poms as a gift. They also reminded me of our cherry blossom tree outside they were so pink and full. I used 3 different colors of pink in the pom poms. They are so quick and easy to make - you can find the tutorial here.


I hope you had a fun and sunny weekend too.

Wednesday, May 1, 2013

Recycled Cherry Blossom Tree


We have an big old cherry tree in our garden that blooms late in spring with huge heavy dark pink blossoms. The petals then drop (all at once it seems) and create a bed of pink on the ground.


I've been struggling to come up with an idea of what to do with our tree since Easter. Then with seeing all the trees and flowers coming in to bloom it gave me a thought - we should make our own cherry blossom tree.

For this project I used recycled tissue paper. For those of you that read my posts regularly I am a total stickler for collecting anything that might be recycled or reused. Tissue paper from gifts is carefully stored away to be used again. Having just had our Princess Party I had a good stack of pink tissue paper to hand. 

I cut circles from the tissue paper (not precise cutting needed.) I then crumpled 4 layers of tissue paper together - the more crumpled the paper the more texture the flowers have - which is why second hand tissue paper was perfect for this project.


I flattened out the circles again and then cinched the middle of the circle together with a ribbon. I did use some recycled ribbon for this project too but I also used 1/8" ribbon that I found for 59c on sale at JoAnn.


Bunny #1 liked to crumple the tissue and cut the ribbon but sadly she grew tired of the repetitive nature of this project. For our next tree project I will have to remember the 'little 3 minute projects filled with glitter gems' rule!

All of the finished flowers lying together already looked tempting. 


I then tied all the flowers to the branches of our tree securing with little bows behind each flower.


Our tree has blossomed for the Spring.  


Despite being bored of making the flowers (I made 90 in total!) the girls are enchanted with the tree. And my eldest did enjoy making this happy little caterpillar who is now living in its branches.


You can read more about our tree project on these posts:
Swedish Easter Tree
Valentine Tree