Showing posts with label union jack. Show all posts

Wednesday, January 8, 2014

Union Jack Patchwork Quilt

This was a custom quilt that I made for a family for Christmas. The wife had seen my Union Jack Recycled Sweater Quilt and wanted a Union Jack Quilt - perfect sofa size for her husband - who was British too.

I'm surprised at how much I enjoyed quilting this quilt because I'm usually really nervous about starting the quilting process of a quilt - but all that practice must be paying off as I'm really pleased with this quilt - as is the receiving family.


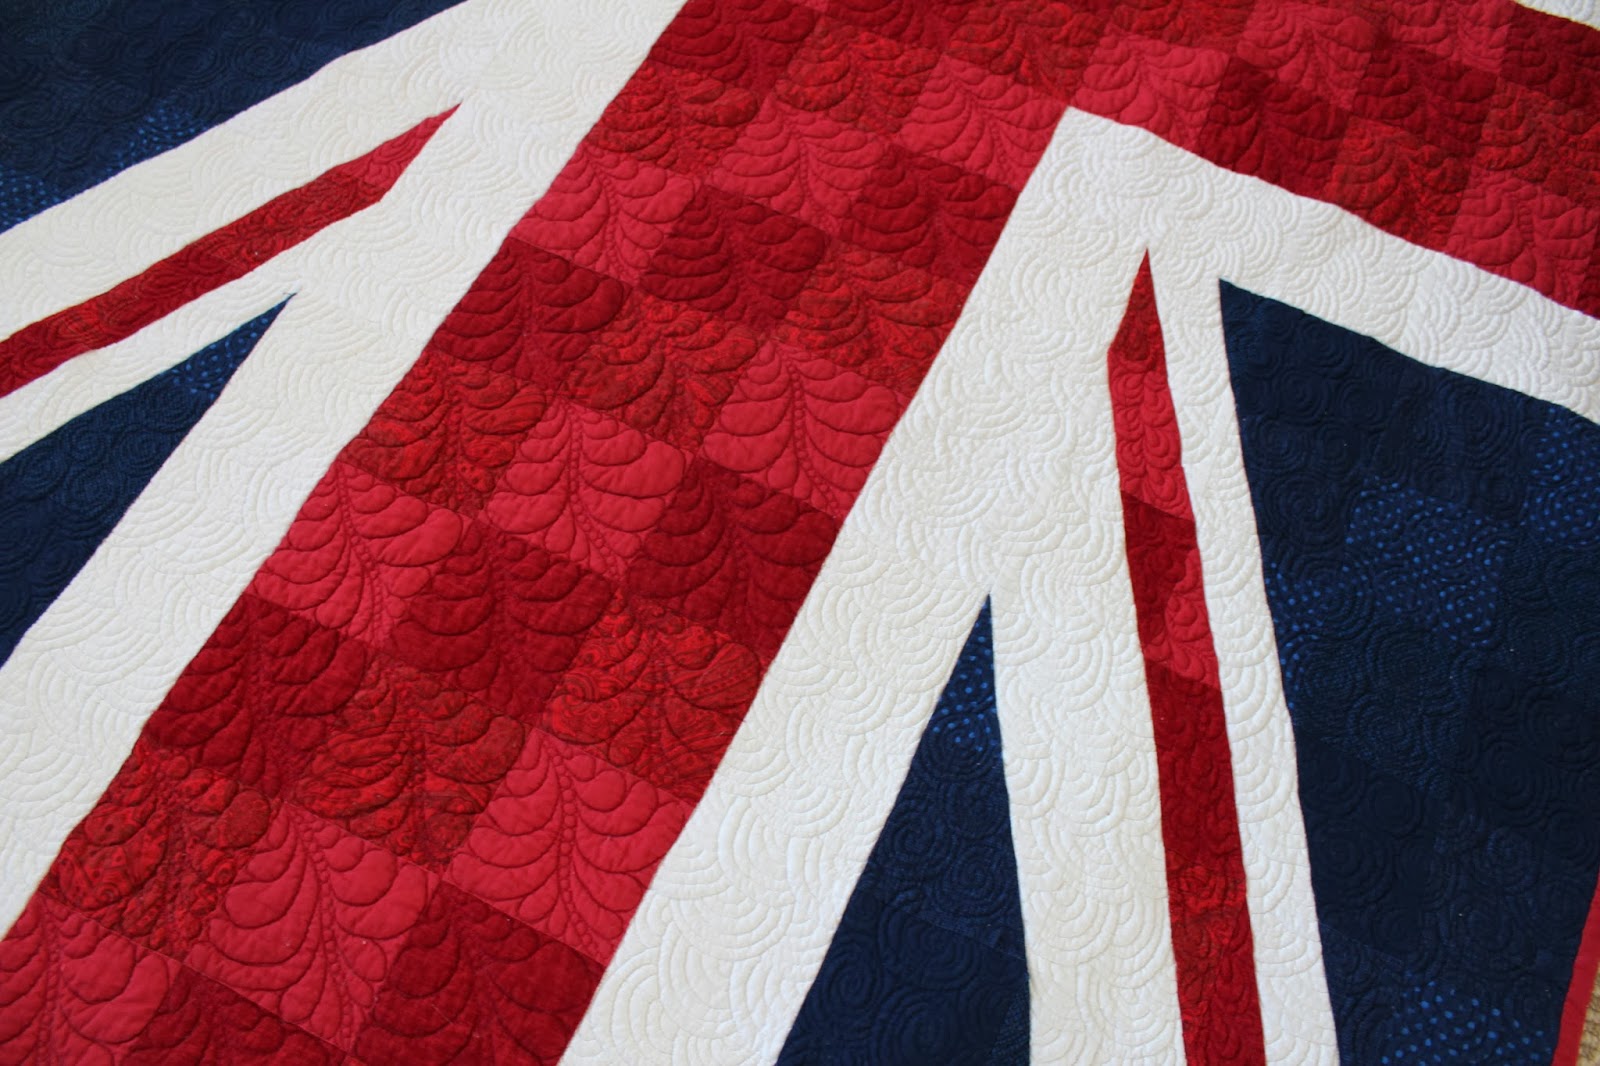
The red squares are quilted using a design I first saw on Leah Day's Free Motion Quilting Project - she calls the design Pearled Feather

Sticking with Leah's site to describe the other parts of the quilt design. The white portions of the quilt are quilted in Echo Shell - but I used 5 echos on each shell.

The red diagonals are sort of like a mussel shell

The blue squares are quilted in a spiral that I honed from Angela Walters class on craftsy.


The quilt measured approx 92" x 52". It might be the last large quilt I quilt on Bernie (sssh don't tell him.) I felt pleased with the result.

Technical Info:
Batting: Supreme Loft Quilters Dream Cotton Batting
Backing Fabric: Wide Flannel Quilt Backing Leaf Black
Top: Blue Fabrics: Bumper 2 Bumper Tonal Dot Dark Blue, Peanuts Hugs for Heroes Netting Navy, Timeless Treasures Sketch Navy, Kona Dimensions Honeycomb Navy. Red Fabric: Christmas Peace Paisley Red, Timeless Treasures Soho Solid Broadcloth Cranberry, Moda Weave Texture Country Red, White Fabric: Various white on white fabrics from stash.
Border & Binding: Timeless Treasures Soho Solid Broadcloth Cranberry
Thread: Aurifil Quilting Thread 50 wt Dark Navy, Natural White, Carmine Red & Sulky® Clear Premier Invisible Thread in bobbin

Monday, September 23, 2013

Union Jack Recycled Sweater Quilt

I put this quilt together in May - if you remember I used scrap cotton on the back of the felted sweaters to help keep their shape after they were cut and while I was piecing them together  and then you saw me layer it in June with my trusty cardboard roll.

This quilt has been sitting staring at me from our spare room waiting until I felt confident enough to take it on with my improving free motion quilting skills. 


I quilted the quilt from the back. The backing is mostly a light blue paisley pattern with a scrappy strip along one edge. Following the paisley curves gave a very fluid soft quilting pattern on top. My thanks to my quilting teacher Teri who suggested this idea. It is something I will surely use again - using the backing as an outline for quilting patterns. 


The finished quilt measures 86 x 72. I used flannel instead of cotton on the top as I wanted something with a soft/fuller texture to blend in with the felted sweaters. The flannel & felted sweaters give it a heavier cosy feel - perfect for the winter which unfortunately will probably soon be here. 


The Union Jack is placed on the bottom 2/3rds of the quilt so once you put it on your bed the Union Jack isn't covered by comforters or pillows.


It felt good to make a Union Jack. I've lived in New York for nearly 10 years now. I still feel very British at heart.

Technical Info:
Batting: Warm & Natural 100% Cotton Batting
Backing Fabric: Blue Cotton Paisley from stash
Top: A E Nathan 108" Wide Flannel Quilt Backing Navy
Border & Binding: 108" Wide Flannel Quilt Backing Red
Thread: Aurifil Quilting Thread 50 wt Dark Navy & Sulky® Clear Premier Invisible Thread

Tuesday, June 18, 2013

Quilting Tip: Basting/Layering Quilt

There are so many ways to make quilts. In my humble opinion - as long as you are having fun there is no wrong or right way. Some people are into sewing fabric any way together - other people like to make sure their seams all match precisely – enjoying what you are making is most important. I do however enjoy reading about different ways people do things – make things work - looking for tips to help me – finding people who work in similar ways that I work and that is why I wanted to share the way I put my quilt layers together. I don’t know if it is wrong or right – but I am hoping this little tip can help someone with what I have found to be sometimes a cumbersome experience.

I used to use pins to layer my quilts. I spent hours (literally - perhaps days) ironing, smoothing, pinning, smoothing, repining. It took forever. I recently chatted with Svetlana from s.o.t.a.k handmade and after speaking with her I decided to try out the - often loved by many and perhaps somewhat scorned by some - 505 spray.


It has somewhat changed my life!

The biggest factor is the amount of time saved – which for me with the three little ones is key. Of course the spray is not super cheap – but I don’t use a lot - a very light spritz – so one can lasts for 3 or more full sized quilts. Here is what I do (this is a queen sized quilt.)

I lay the batting out on the floor and smooth it out as much as possible. I use the cardboard fabric tube to roll up my quilt top. 


I spray the first 10” or so of the batting and lay the top 10” of the quilt top on the batting - close to the top & left edge so any remnants from the right & bottom sides of the batting will be big enough to be sewn together again and reused.


I smooth out the top of the quilt as it comes off the roll. If it wrinkles – it easily lifts up and repositions.

I spray and roll in 10” increments smoothing and rubbing all the way.


Keeping the batting flat and smooth underneath I use the cardboard tube to help keep the length of the quilt top flat, taught and smooth on top. Here you can see the beginning of my Recycled Sweater Union Jack peaking out.


Once I have positioned the top layer I trim around the edge of the quilt and batting.


I like to trim the batting off now so I can accurately/neatly/precisely place the quilt top onto the backing fabric - minimizing waste of the backing fabric - the larger I can make the remnants - the more uses I can find for them.

Once trimmed I roll the top with the batting back up on the cardboard tube ...


... and lay out the backing - smoothing it out as much as possible.


I repeat the same process again but with the batting AND the top on the roll.

Once all the layers are together I keep the quilt laid out flat on the spare bed until I'm ready to quilt them. I hope this tip helps you put your larger quilts together in an easier way.  

***********

Please do not forget about the charity I Spy quilt - we are still looking for scrap fabric donations. 

Thursday, May 16, 2013

WIP: Recycled Sweater Union Jack Blanket

I know - you have heard it from me before - but I save everything. Old shirts, sweaters, ties, blankets, curtains, any kind of fabric swatch or scrap - you name it - I have a box with 'stuff' in it waiting for a suitable project. Sometimes I wonder if I have a hoarding problem - but my husband has yet to arrange an intervention!!

This post is about a quilt I am creating out of recycled sweaters. 


For this project so far I have used 3 sweaters (they would be called jumpers in England!) A wool red fair isle sweater, a blue & white striped wool sweater and a small amount from a plain blue wool sweater. I washed the sweaters on the hottest setting possible in my washing machine and then tumble dryed them on hot. After that they were good and ruined for any possible wearing and quite felted!
 
I deconstructed the sweaters carefully and ironed each piece. Then I used 505 spray to stick them on scrap pieces of cotton. I was careful not to stretch out the pieces when laying them on the cotton. (This particular piece of garish green cow emblazoned scrap cotton was from a pillowcase I made my sister some years back - pillowcases make cute gifts and can be made out of all sorts of novelty prints.)


The cotton enabled me to cut perfect squares (2.5" each) and they have stayed in perfect squares while I have been laying out the design. I am going to keep the scrap cotton on the back of the squares when I sew the pieces together.


This is the beginning of my recycled sweater blanket. If you know what the design is going to be I've succeeded so far. Now to sew it all together! 

Ouch - I've spotted a mistake ... do you know what it is? 

Here is my design. Each square is 2.5". (I can e-mail you a larger excel file if you are interested.) It could be used as a patchwork design or base for a knitting design too.


Here we are - mistake all corrected and the first part of the blanket sewn together. 


I'm a lover of different textures - and I used every bit of each sweater - ribbing and all. 


The wool hasn't stretched or warped during the sewing due to the cotton on the back.  


Of course everyone likes to stand on things when Mummy is trying to photograph them. 

Looking forward to finishing this blanket/quilt. I will post once it is completed.