Wednesday, July 30, 2014

Memorial Quilt: Men's Cotton Shirt Quilt

This is a quilt made for a family whom lost their father. Their father loved to wear bright colorful shirts.


I don't often see patchwork patterns that I immediately want to make but when I saw this pattern called Simply Woven by Jessica Kelly - I knew that it would make an amazing quilt from recycled materials. I made my quilt a little larger (it is probably around a king sized quilt) - I had so many shirts I didn't want to waste them!


I also added a border to my quilt as the family have more traditional tastes and I think formal borders always make things seem a bit more traditional in style.


I used my mix and match all over technique for the filler pattern. And a simple feather border ...


... my feather corners are getting better.


The mix and match design blends really well on the front of the quilt ...

 
... it is the back clearly shows all the detail.


I tried to mimic a little bit of the woven element on the back too.


And in case you don't believe this is made from men's cotton shirts - there are little bits on the front to remind you.


Wednesday, July 23, 2014

Tutorial: Four Simple Hooded Capes for under $15


This Hooded Cape (and the variations you will see below) is a really really easy & quick project to make. It is a fabulous addition to your kids dress up box. You can make this cape to any size (even for adults) in under an hour.


Before you purchase your fabric measure the height of the person this cape is for.  For example:
Bunny#1 is 42" = approx 1.25 yards
Bunny #2 is 39" = approx 1.125 yards
Bunny#3 is 36" = 1 yard

You will need:
  • Material the same length as the height of the person the cape is for. I trimmed all my fabrics to a standard 42" width.
  • Thread
  • Ribbon (I used recycled ribbon from Christmas/presents past)
  • Big sharp needle for threading ribbon.
  • Knitting needle - or something similar - for making holes in fabric
 Optional
  • Tulle or Organza same length as the height of the person the cape is for
  • Glittery beads
Basic Pattern Outline

Instructions
1. Hem your fabric on 3 edges - left edge, right edge & bottom edge. I like to use a skinny rolled hem - but you could just use a zig zag or overlocking stitch if you prefer.

TIP: When I make a rolled hem I use my embroidery foot which has a handy space in the middle - using this as a guide - it helps me keep the rolled hem consistent in size - I roll as I go - which strangely I find less problematic than pinning first.

 Optional: Add your tulle or organza at this point if you want. Tulle shouldn't fray - but organza will need a zigzag or overlocking stitch along the edges. Include the tulle or organza along the hem/edges of your capes fabric for the top 14" on the left and right sides only. This will ensure that the tulle will be neatly attached to/included the hood but free flowing on the rest of the cape.


2.  Fold your fabric in two (right side of fabric up) and mark down the folded side at the 14" point. Make an arc from the 14" point to the top right hand corner. I have drawn mine with a pen so you can see the line - but I would suggest perhaps using a removable fabric marker. (Whats the plate for? - For some reason putting the big plate in the middle of the folded fabric helps me draw an arc freehand.)


3.  Pin & sew along your marked line. 


TIP: When working with shiny, furry or silky fabrics I like to use a walking foot. This prevents the fabric from sliding around underneath the foot while you are sewing.

4. Cut the arc 1/8" away from the seam.  Turn the seam inside out - so the right sides are now together - pin and sew - this is what is called a French seam. You can find a great tutorial on french seams here on Craftsy. Don't be intimidated - a 'french seam' sounds more complicated than it is.
Optional: If the idea of a french seam fills you with dread. Fold your fabric and mark your arc on the wrong side of the fabric - make a traditional seam & use a zigzag or overlocking stitch to prevent the seam from fraying. 

5. Iron your fabric - it will be easier to do this now before the ribbon has gathered the fabric. While ironing fold the top part of the hood over and make a crease vertically along the 14" mark of the fabric.


6. Thread a ribbon along this 14" mark/fold. If your big sharp needle won't do the job - makes holes with a sharp knitting needle first. Make the holes about every 2 inches.
Optional: Add some bling/beads to your ribbon.

We got all of our materials at JoAnn's. Cost of capes are shown below.

Mermaid Cape
- 1.125 yd of Satin in Violet $3.36
- 1.125yd of Glitter wave organza in jade $5.36
- Thread - from stash
- Recycled Ribbon from stash
- Beads $3.99 (with lots left over)
TOTAL COST: $12.71

 Can you guess who is under the cape?
 
 Jewels from the bottom of the sea?

It is Ariel!!!

Little Red Riding Hood Cape
- 1.25 yds of Glitter Satin in Tango Red $7.49
- Thread - from stash
- Recycled Ribbon from stash
TOTAL COST: $2.99
 Little Red Riding Hood off into the woods - lets hope she stays safe.

Here is what she selected for her Grandmother. 

This was the most coveted out of all of the cloaks we made. How adorable does Bunny #2 look!

Batman or Pirate Cape
- 1yd of Satin in Black $2.99
- Thread - from stash
- Recycled Ribbon from stash
TOTAL COST: $2.99


Frozen or Cinderella Cape
- 1.25yd of Glitter Satin in Powder Blue $3.75
- 1.25yd of Teardrop White Tulle $6.24
- Thread - from stash
- Recycled Ribbon from stash
- Beads $3.99 (with lots left over)
TOTAL COST: $13.98

 This cape was inspired by my girls love of Elsa from Frozen. We don't have a Frozen dress in our dress up box (yet I suspect) so we used Cinderella's dress instead. 
I think the cape could work for Elsa or Cinderella.


 Some bling. 

 And some singing and dancing of 'Let it Go' .....

I really hope this tutorial helps you and your little ones make some capes to have fun in.

Monday, July 21, 2014

Labels of Love

Often I add labels to the quilts I make - often I use the tag line 'handmade with love' those who know me well know how true this tag line is. But for the Kilt & Coat Quilts - these have a different label.


The family requested these labels for their quilts ...


"Beannacht leat go bhfeicfidh mé aris thú" is Irish Gaelic for 'Until we meet again' - or a literal translation is 'Blessings until I see you again'. Which for these quilts with deep Irish roots & laden with Irish kilts - was so perfect.

I simply ADORE these photos that I took of the siblings when they picked up the quilts. The pictures - to me at least - scream what my Quilting A Memory project/charity is all about. 


I am working on more Memorial & Memory Quilts and I look forward to sharing the results with you soon.

Wednesday, July 16, 2014

Kids Art Quilt: Sun Paintings

I have been working on the last Kids Spin Art Quilt and a quilt made with Bunny #1's first fabric line - I should really finish & quilt them .... and I can make all the excuses in the world to why we haven't completed them yet - but it seems a fact of life these days that my personal projects seem to take a back seat these days.

So like any insane person - I decided to add another project to my 'to be completed list'. This was a really fun & easy project to do with my young bunnies. I wish that I had taken more photos of the kids doing the project rather than the end results - but between fabric dye flying around, helping them cover the fabric, food stuffs being thrown everywhere & there being 3 of them and only one of me - it was a tad hectic - really fun but a wee bit hectic.


After painting the fabric and leaving the pieces in the sun for about 2+ hours (until they were completely dry) I put them through the hottest cycle in the tumble dryer, washed them in a warm wash and dried them again on the hottest setting in the tumble dryer.

What we used:
  • Setacolor Transparent Paints (diluted approx 1 part paint to 1 part water)
  • Brushes & paint cups
  • White Cotton
  • Random selection of things from the house - pasta, cereal, oats, rice, plastic lids, cardboard stencils, glass pebbles etc
We laid out our cotton fabric on damp plastic tables in the shade (it is important you are not in the sun for the painting bit.) The fabric stuck nice & flat on the wet tables. After we had finished the project the tables were a bit of a mess - most of the color came out with a bit of soft scrub. If we do think again (which we surely will) I will be mounting the fabric to cardboard so they are easier to carry & the cardboard can be discarded after they have been finished with. 


Bunny #2 (3 years old) got bored trying to cover all the fabric on her own - she really needed help to cover all the fabric. But when she says she is done there isn't much you can do to change her mind. So her first painting was 'mostly' purple and then she emptied a ton of rice onto it.

BEFORE


AFTER


Bunny #1 needed help to cover the fabric too but was fully into the decorating the fabric. Her first piece of fabric we used a heart cardboard stencil in the center and plastic lids to make circles.

BEFORE


I think we might have diluted her paint too much as her spots are not as bright as I would have liked them to be.

AFTER


This is the only one I painted. Pink with yellow spots and the kids threw swirly pasta all over it.

BEFORE


Looking at the results - Bunny #2 has the right approach - more decorating is better. 

AFTER


Then we decided to paint some stories.  Bunny#1 painted a beach, sea & sunset. She used a cardboard stencil for the sun, piles of oats for the clouds, spaghetti for seaweed, more oats for sand and glass pebbles for stones.

BEFORE


AFTER


Bunny #2 is really into mermaids so she painted a sea & sunset - she actually poured the yellow color on. We didn't have a mermaid stencil so she settled on a dolphin and a fish, glass pebbles for rocks and piles of oats for clouds. 

BEFORE


AFTER


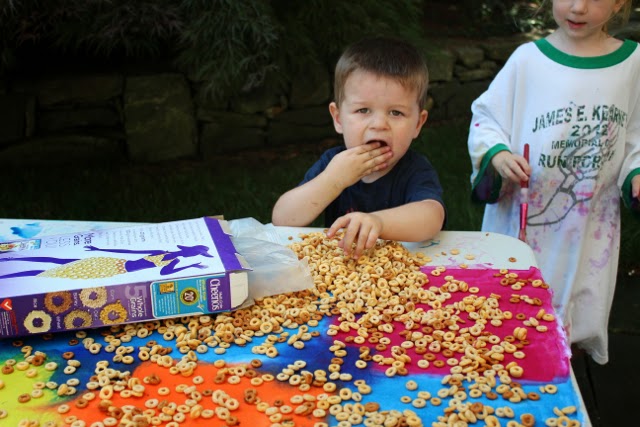
Here is Bunny #3 helping to distribute some cheerios over the a piece of cotton painted in blocks of different colors. (I really wouldn't suggest allowing your kids to eat Cheerios off of fabric paint.)

BEFORE


AFTER


And Bunny #1's final art work of a rainbow, sun & clouds. She was very definite that there should only be two pasta bows - one for the sun & one for the rainbow - the clouds are made from piles of oats again.

BEFORE


AFTER


I'm going to make 2 quilts one of each of the girls out of these prints - want to know what the quilts will look like? Stay tuned!