Showing posts with label free motion quilting design. Show all posts

Monday, September 29, 2014

Keep a Scrapbook: Ideas & Sketches for Free Motion Quilting

When I find a quilting pattern I like I scribble a version into my sketch book (emphasis on scribble - if anyone saw my sketchbook their opinion on my artistic talents would be very poor!) - beside my scribble I put the name of the designer, book and a page number if applicable. As well as my scribbles I also cut out designs I see done by other quilters and stick them in.


Personally I feel that your style of free motion quilting will be individual - regardless of the pattern you use - as we all have different hand writing - so we too will all have different quilting styles. I'm not too focused on being original - because as far as I can figure out every idea I have ever had has been done before!! But I am focused on being good at what I do - and sadly the only way to get better at anything is by practice. (Gosh how dull is that!)

If you are focused on getting better at free motion quilting using a sketch book is a really great way to help you practice patterns and record ideas. You can take it anywhere - stick anything in it - scrawl in a way that no one will understand (that's me!) - and it doesn't matter - because it is to record your inspiration and ideas. When you flick back through it you will be amazed at how many ideas are there - it is always the first thing I reach for when I am stuck as to how to start a quilt.

If I think about how much I have improved in confidence as well as technical and ability in 9 months since getting Freddie - it makes me feel mildly warm and fuzzy. Teri's words 'practice, practice and practice' are still ring in my ears - and it is true - it doesn't get easier overnight - but just keep going, keep practicing and the possibilities are endless. The only way to get better is by practice and drawing the designs over and over again - it will all help you when you eventually bring your material to your machine and quilt with confidence.  

 Notes for designs on Maria's Curve Quilt


As a quilter (can I say that now?) I feel like every pattern I look at makes me think 'ooh that would make a nice quilt' - keeping notes and drawing patterns help me remember all the inspiration and ideas that spring into my little head.

My sketchbook scribbles are much too messy to share - but check out LuAnn Kessi's website - she shares so many of her sketches with all of us - they are gorgeous. She also wrote an article in Machine Quilting all about keeping a Design Sketchbook.

Wednesday, September 10, 2014

Flora & Fauna

"Fauna is all of the animal life of any particular region or time. The corresponding term for plants is Flora." - so Wikipedia tells me.
This is a quilt I have been thinking about making for quite some time - not so much the flora & fauna aspect of it but the big colorful initial in the center and then detailed flowing quilting all around on the white fabric. 


A little girl named Flora just turned 5 so it seemed like a perfect opportunity to create this quilt and go wild with feathers and flower-ish shapes. 

The letter F is made from sewing scraps from my scrap bins into strips. I ironed the strips to a light iron-on fusible & cut the letter 'f' out. Then ironed it to the middle of the fabric securing with a small zigzag stitch.


I played with swirls, pebbles, feathers and petals.  The quilting was 100% improvised as I went with no marking.

Feather trees bloom on this quilt. 


In fact all sorts of wonderful flowery plants bloom on this quilt.


I didn't forget the odd vegetable - peas in the pod are really easy and fun to quilt.


I realize now that I forgot to photograph the strawberry patch that lives in this quilt. Can you spot it? There are a few strawberries peeking in on the top left hand corner of the photo below.  


There are also some fauna for little Flora to hunt out. In amongst the feathers and flowers live a caterpillar, a snail, a butterfly, a dragonfly, a lost peacock feather and a birds next with 3 eggs waiting to hatch (I need to work on my nests a little before I'm happy to share photos of them - I'm hoping a 5 year old will be more forgiving!)


I love quilting like this - free & easy - quilting what ever comes to mind next - experimenting with combinations of designs and shapes. Nothing could make me happier. (Although possibly someone feeding me diet coke & chocolate while I quilt .......) 


There is also a rather cute label on the back of this quilt. 


Thursday, September 4, 2014

Four Must Have Books for Beginner Free Motion Quilting

I have a lot of books on free motion quilting. I buy as many as I can second hand for a couple of dollars - you can find a lot of second hand books through sellers on Amazon now - or on e-bay. Books are great to have and browse through looking for new ideas and new approaches to old designs.

Here are my favorite books for someone who is looking to start free motion quilting beyond the basic stipple.


First Steps to free-motion quilting by Christina Cameli
Christina has approx 60 or so free motion quilting designs for you to try. She pairs these designs with simple quilting projects - so you get 24 project suggestions AND 60 or so quilting design ideas. For a beginner wanting to know what to make and how to quilt it - this seems the perfect starting point.


Free-Motion Quilting with Angela Walters
Bold easy to follow designs. Angela's focus is on having fun an not on perfection. It is hard not to want to be Angela!


Doodle Quilting by Cheryl Malkowski
A fabulous book - do not be intimidated by the picture on the front. Work from the beginning through the book repeating each exercise/pattern. Each idea is clearly drawn out for you to follow. The patterns do get more complicated as you go along - so as a beginner you will probably want to concentrate on the first half of the book until you feel more confident to try the second half.

Pocket Guide to Freehanding by Darlene Epp
The only draw back of these little books is that they seem expensive because they are purchased in a set (You can find them second hand - but they go quickly so act fast!) They are great little books - no fluff or fancy pictures - just simple clear drawings for quilting designs. I think that the Pocket Guide to Freehanding is the best one to start with for beginners.

Don't want to buy books? I have to mention the amazing resource of the talented Leah Day. Leah has 400+ video tutorials on freemotion quilting designs on her website. Go here to see the designs grouped in difficulty level. Leah's website is my go to place for when I am stuck with inspiration.

Tuesday, September 2, 2014

Groovy Curvy Quilt

This quilt top was put together by the lovely Maria. You can see some other of Maria's quilts here and here. Maria's quilts are a dream to work with. Her piecing is wonderful, the colors she works with are amazing and her backs and put together in a way (1/2" seam allowance pressed open) which makes me as a longarmer swoon with gratitude.


This is a quilt pattern called "Groove" by Carolina Patchworks.


The other wonderful thing about Maria's work is it is nothing like any quilt I would make - they are more modern and bold than I would ever dream to try - they are divine and they take me in new direction that challenge me to think and maybe do things that I might not do if not pushed in that direction.


I have found that I really enjoy matching threads. Superior had threads in their SoFine range that matched perfectly to the colors Maria had used.

Solid colors really show the quilting designs AND they will show every mistake you make. Patterned fabrics are more forgiving to those little mistakes you might make. If you want to start freemotion quilting - you might find that you will be more relaxed and pleased with your results if you begin by using patterned fabrics.


Maria wanted a different design on each section (but no feathers!)


There are 17 'sections' to this quilt - so that is 17 patterns I needed to think of - and because the quilt has that sort of retro feel to it I wanted to use patterns that had a bold look to them - curves beside straight lines beside flowers etc so that each block of color complimented yet contrasted the one beside it in texture, size of design and color.


I mark very little when I quilt. The most I do is dots at each corner of a 1.5" or 2" square stencil grid (I purchased mine from the Longarm University.) The dots help me keep my designs straight & evenly spaced. I have mentioned in the list below if I mark to help keep the design on track. I use a dissolvable marker when I mark (the blue cheap as chips sort) - I use a very light touch when using them - and I keep a spray bottle of water on hand for when I have finished that area.

All these patterns are suitable for freemotion quilting on your domestic or longarm. From the top of the quilt down we have:

1) Basic Paisley/Teardrop Meander (white) for paisley ideas check out Leah Day's paisley tutorial and other ideas for the design or AQPS call this the Crybaby Meander is a very clear tutorial.
2) Checks (orange) - this design was created by making 1.5" squares  with straight lines (connecting my marked dots) and then going back on the diagonal filling in every other square with something like a Cursive F pattern.
3) McTavishing (mauve) - Karen McTavish is my quilting hero - buy her books - search for her techniques on the internet. It is such a wonderful technique and looks amazing on anything. 
4) Flower Power (burgundy) - I learnt this pattern in Angela Walters Craftsy class Machine Quilting Negative Space - you can also find this pattern on Pg 67 of her book. It is a surprisingly easy pattern that fills quickly and enables you to move around easily.


5) Diamonds (yellow) - diamonds made with straight lines (connecting marked dots) and then every other diamond is filled in using straight lines back and forth.
6) Echo P's (burgundy) - This is a more rigid version of a design I spotted on LuAnn Kessi's website.
7) Spirals & Pebble mix (pink) - cluster of 3 spirals together surrounded by pebbles
8) Echo Shells (white) - a trusty pleasing pattern you should definitely be in your 'go to' designs. Leah Day has a tutorial for this design too. I have found it does take practice to make it look really good - and I still feel I need to master this one. I think I will try marking with dots in future with this pattern.


(I really love the diamonds.)
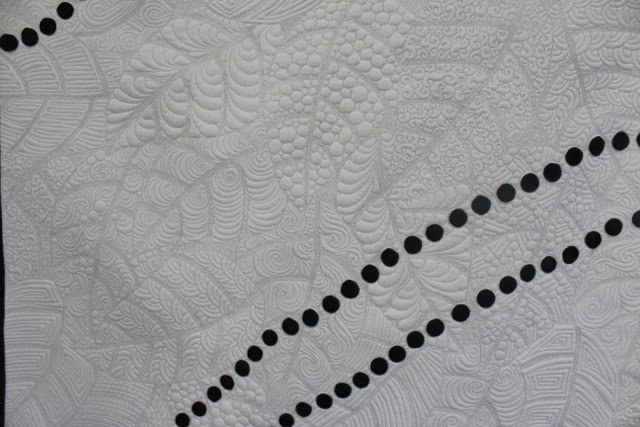


9) Orange Peel (white - above) - I mark with dots for this design. (There are also some really cool variations of this design that you can play with if you are looking for something more advanced to try.)
10 Spirals (mauve - above) - spirals are great and can transform into lots of really cool designs.
11) Wavy ripples (orange - below) - LuAnn Kessi calls this design hairbands. It is a very quick and simple design to use.


12) Suns (yellow) - this is a design from Sheila Sinclair Snyder's book Get Addicted to Free-motion quilting. The design is on page 20 of the book and is called Spurs with curves. (This is a great book by the way!) This is the first time I have used this design on a quilt but I really like it.


12) Retro Flowers with pebbles (mauve) -  design is adapted from a design I saw in Pg 9 of Machine Freehand Patterns by Nan Moore. This book is hard to find check out 2nd hand book stores and e-bay to snag a copy.


13) Greek Key squares (orange) - I mark with dots for this design. This design is hard - both in judging the squares, keeping the lines equal and being able to move around easily without becoming stuck. But once you have figured out the 'secret' it does get easier. I can not find a tutorial for this one - perhaps I should do one?


15)  Lines (white - above & below) - My lines on Maria's quilt are softly curved. I find lines really really hard - straight or curved with a ruler or without - they are my top thing I struggle with. I do not know why people perceive lines to be easy. They are not. If you are working on a longarm you can use a ruler which will help you massively (supposedly - I must not be using mine right!). Handiquilter has a detailed presentation on rulers here.
16) Mermaid scales (burgundy) - This is an upside down and echoed version of Leah Day's Sashiko Shell. I spotted this echoed version on a recent quilt of Angela Walters that you can see here.
17) Pebbles (orange) - another great design that can take you anywhere and fill in and surround anything. There are many different ways to make a circle while free motion quilting - you should go with the way that makes most sense to you.


Would you like to see the back?


Tuesday, August 5, 2014

Kids Art Quilt: Bess Beetle

There are few things I am more passionate about than turning clothes into quilts - but making quilts from kids art work is probably up there too. This was a quilt that I took some 8 days to longarm - that is about 64 hours of non stop quilting - which for a good sized twin sized quilt is a pretty decent amount. This quilt has some fun surprises in it too. The original drawing of Bess Beetle can be seen here. 

To begin with I began Googling 'beetles' to get some ideas. Beetle tracks popped up - and I liked that idea. So there are beetle tracks all over the quilt. I made my beetle tracks with a round foam brush and black fabric paint. Once the paint was dry & heat set with a hot iron it was time to load the quilt onto Freddie and begin quilting around those beetle tracks.


Have you spotted the quilting design yet? It is a mix and match leaf pattern. All the leaves are the same shape.


I made my own template out of a cereal packet to quickly mark the outlines & then each leaf line is heavily quilted - more than a micro stipple - and each leaf has its own design.


Bess herself was made from a panel I created and ordered through Spoonflower.  (Spoonflower Tip: To create an image the same size as the width of the fabric your picture needs to measure 6300 pixels x 5400 pixels.) Here is Bess ....


Here is what the whole quilt looks like.


 And of course you need to see the back. 


 And that isn't it.

What is this? A little bag? What could be in it?


Well when Bess was with us she had some babies. (Again with the help of Spoonflower.) Fifteen babies to be exact.


And on the back of each baby is a piece of Velcro. 


And each baby attaches to various places on the quilt. (The black beetle tracks hide the Velcro spots perfectly.) I wonder if S will be able to find where they live!


I used a wool batting AND a cotton batting for this quilt so the texture is divine. 


And here is the quilt - all folded up and concealed in its matching Bess Beetle pillowcase.  Did I forget to mention I made a matching pillowcase too? I used a very old pillowcase tutorial of mine - and I was pleased that it all still made sense!


I really hope that Asia & S love their beetle quilt as much as I loved making it.