I can't believe it is that time of the year again - my two smallest bunnies have finished their year at nursery school and it was time to think about teacher appreciation gifts again. (On a small Mummy note I am struggling with how fast these little people grow up and how I long to have more - oh dear husband of mine are you reading this???)
I have wanted to make a little art gallery quilt for a longtime now and this was the perfect opportunity. (I find giving gifts is a great way to try out a new idea!) Each child's parent in the class gave me their favorite piece of art work - we have had some really great/fun art work come home this year.
I scanned each piece of art work and enlarged them so they were all of a similar size. I printed the artwork onto a yard of fabric using Spoonflower. I added a simple 'frame' to each picture as well as the artists name.
I wanted the background fabric to look like wallpaper as though the art was hanging on a wall. I tried very hard to get the seam to match perfectly so you can't see the seam. Can you see the seam? (and yes I was quietly proud of this moment in my sewing history.)
Part of what I love most about these gifts is the labels. I took the class photo and made it into a label. I use printable paper and our home printer to make the labels - you heat set the ink with an iron (it does fade a little with washing) but it does the job well.
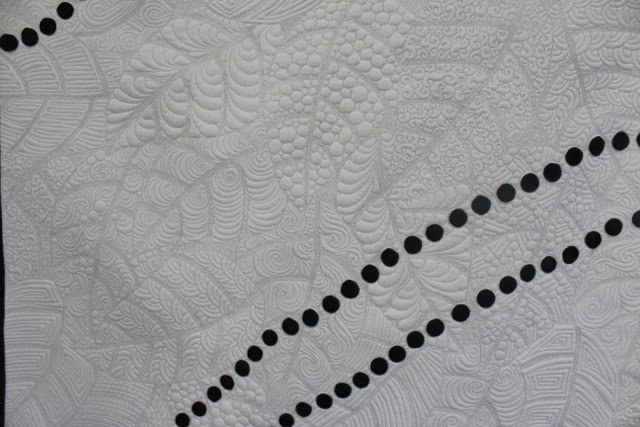
I did some very simple quilting on the quilt. Double loop the loops on the background and a little bit of quilting on the art. You can see the detail of the quilting much clearer from the back.
Another year has dashed past. Thank you to all the teachers out there that bring joy, laughter and learning to our little bunnies on a daily basis.
If you remember for the past two years we have made hand print pillows that were mighty cute too - you can check those out here Teacher Appreciation Hand Print Pillows (2014) & Teacher Appreciation Hand Print Pillows (2013).
I have another teacher appreciation quilt in the works - its a really great quilt so stay tuned I will be able to share that with you soon too.
Showing posts with label custom quilting. Show all posts
Saturday, June 6, 2015
Wednesday, December 17, 2014
Memory Quilt: Toddler Dresses
Just to recap these toddler dresses were given to me to make a pillow. I couldn't bear to just cut chunks out of the dresses without using up all the material given to me - so I suggested a quilt as well.
I have had this idea of having an actual dress sewn to the middle of a quilt - as if in a picture frame for a while now. This quilt is for a 4 year old girl - the youngest of all the sisters who have worn these dresses.
The back of the blue dress was so pretty with its buttons and wide bow - I knew that was the dress to use.
I used some petals left over from the memory pillow to create her flowers. The ribbon on her flowers and in her hair are from the dresses. Her shoes are made from the grey wool dress.
I used the remaining pieces from the dresses to create a 'picture frame' around the dress.
In the border there are lots of cute little details like lace, the stitched boats on the pink striped dress and the pleats and stitched flowers in the blue satin dress front.
Here is some up close detail of the quilting around the girl.
Some of the pebbles are very small.
Hair has become a small obsession of mine to take further next year. The braid is actually another piece of brown fabric appliqued onto the hair shape and then I quilted on top of the layers in a lighter thread color to highlight the shape of the hairstyle. It turned out really well.
It sits wonderfully on a queen bed.
I'm excited for the little girl to receive it. I'm planning it will get to her in time for Christmas. I really hope they enjoy using it.
I have had this idea of having an actual dress sewn to the middle of a quilt - as if in a picture frame for a while now. This quilt is for a 4 year old girl - the youngest of all the sisters who have worn these dresses.
The back of the blue dress was so pretty with its buttons and wide bow - I knew that was the dress to use.
I used some petals left over from the memory pillow to create her flowers. The ribbon on her flowers and in her hair are from the dresses. Her shoes are made from the grey wool dress.
I used the remaining pieces from the dresses to create a 'picture frame' around the dress.
Mini orange peel is a little bit of a favorite pattern for me at the moment. You can take orange peel in some many different directions - it is a fabulous pattern to play with.
In the border there are lots of cute little details like lace, the stitched boats on the pink striped dress and the pleats and stitched flowers in the blue satin dress front.
Here is some up close detail of the quilting around the girl.
Therapeutic Mctavishing for the sky.
She is standing on the shore looking out. There are a lot of pebbles and shells beneath her feet.

Some of the pebbles are very small.
Hair has become a small obsession of mine to take further next year. The braid is actually another piece of brown fabric appliqued onto the hair shape and then I quilted on top of the layers in a lighter thread color to highlight the shape of the hairstyle. It turned out really well.
It sits wonderfully on a queen bed.
I'm excited for the little girl to receive it. I'm planning it will get to her in time for Christmas. I really hope they enjoy using it.
Tuesday, October 14, 2014
Memorial Quilt: Firefighters Family
I was given a large amount of material for these quilts. These quilts are made for two 5 year old twin boys whose father (a firefighter) passed away.
In the basket of materials I was given were t-shirts, mens white vests, bandanas, football jerseys, sports shorts - a whole lot of materials that you would perhaps never dream would go so well together into a quilt. I mixed all the different materials together in their color groups and they look amazing.
The family requested a large bold patriotic design and for the quilts to be similar.
The entire quilt from the front to the back to the binding is made from the clothing. The project did take me a longer longer than I had planned. But I think it was utterly worth it. The firefighter was an owner in a local bar - so the back of the quilts are styled in the way that you might find signs and registration plates tacked on a sports bar wall. Scattered - but with a purpose. A large proportion of the backs are made from his bandanas - cut into quarters and sewn on point.
The biggest shocker for me with the project is how I quilted the quilts. No fancy quilting. Just simple in the ditch.
And of course some matching pillows which have his football jersey number on the back.
And while I enjoyed taking these quilts for a photo shoot at my local fire station with some not too shabby firemen - I have to admit that I got rather teary when I was sewing on the labels for these quilts. A wonderful family man - a man who saved and protected - lost all too soon.
In the basket of materials I was given were t-shirts, mens white vests, bandanas, football jerseys, sports shorts - a whole lot of materials that you would perhaps never dream would go so well together into a quilt. I mixed all the different materials together in their color groups and they look amazing.
The family requested a large bold patriotic design and for the quilts to be similar.
(The quilt design is adapted from the Stars & Strips pattern found on McCalls Quilting.
The entire quilt from the front to the back to the binding is made from the clothing. The project did take me a longer longer than I had planned. But I think it was utterly worth it. The firefighter was an owner in a local bar - so the back of the quilts are styled in the way that you might find signs and registration plates tacked on a sports bar wall. Scattered - but with a purpose. A large proportion of the backs are made from his bandanas - cut into quarters and sewn on point.
Various badges and emblems from the t-shirts are also sewn to the front of the quilts.
Also - my favorite part of the quilts is the denim horseshoes - taken from the pockets of his jeans.
The stars and stripes section of the quilt fit perfectly on a queen sized bed.
And of course some matching pillows which have his football jersey number on the back.
And while I enjoyed taking these quilts for a photo shoot at my local fire station with some not too shabby firemen - I have to admit that I got rather teary when I was sewing on the labels for these quilts. A wonderful family man - a man who saved and protected - lost all too soon.
Tuesday, August 5, 2014
Kids Art Quilt: Bess Beetle
There are few things I am more passionate about than turning clothes into quilts - but making quilts from kids art work is probably up there too. This was a quilt that I took some 8 days to longarm - that is about 64 hours of non stop quilting - which for a good sized twin sized quilt is a pretty decent amount. This quilt has some fun surprises in it too. The original drawing of Bess Beetle can be seen here.

Have you spotted the quilting design yet? It is a mix and match leaf pattern. All the leaves are the same shape.
I made my own template out of a cereal packet to quickly mark the outlines & then each leaf line is heavily quilted - more than a micro stipple - and each leaf has its own design.
Bess herself was made from a panel I created and ordered through Spoonflower. (Spoonflower Tip: To create an image the same size as the width of the fabric your picture needs to measure 6300 pixels x 5400 pixels.) Here is Bess ....
Here is what the whole quilt looks like.
And that isn't it.
What is this? A little bag? What could be in it?
Well when Bess was with us she had some babies. (Again with the help of Spoonflower.) Fifteen babies to be exact.
And on the back of each baby is a piece of Velcro.
And each baby attaches to various places on the quilt. (The black beetle tracks hide the Velcro spots perfectly.) I wonder if S will be able to find where they live!
I used a wool batting AND a cotton batting for this quilt so the texture is divine.
And here is the quilt - all folded up and concealed in its matching Bess Beetle pillowcase. Did I forget to mention I made a matching pillowcase too? I used a very old pillowcase tutorial of mine - and I was pleased that it all still made sense!
I really hope that Asia & S love their beetle quilt as much as I loved making it.
To begin with I began Googling 'beetles' to get some ideas. Beetle tracks popped up - and I liked that idea. So there are beetle tracks all over the quilt. I made my beetle tracks with a round foam brush and black fabric paint. Once the paint was dry & heat set with a hot iron it was time to load the quilt onto Freddie and begin quilting around those beetle tracks.

Have you spotted the quilting design yet? It is a mix and match leaf pattern. All the leaves are the same shape.
I made my own template out of a cereal packet to quickly mark the outlines & then each leaf line is heavily quilted - more than a micro stipple - and each leaf has its own design.
Bess herself was made from a panel I created and ordered through Spoonflower. (Spoonflower Tip: To create an image the same size as the width of the fabric your picture needs to measure 6300 pixels x 5400 pixels.) Here is Bess ....
Here is what the whole quilt looks like.
And of course you need to see the back.
What is this? A little bag? What could be in it?
Well when Bess was with us she had some babies. (Again with the help of Spoonflower.) Fifteen babies to be exact.
And on the back of each baby is a piece of Velcro.
And each baby attaches to various places on the quilt. (The black beetle tracks hide the Velcro spots perfectly.) I wonder if S will be able to find where they live!
I used a wool batting AND a cotton batting for this quilt so the texture is divine.
And here is the quilt - all folded up and concealed in its matching Bess Beetle pillowcase. Did I forget to mention I made a matching pillowcase too? I used a very old pillowcase tutorial of mine - and I was pleased that it all still made sense!
I really hope that Asia & S love their beetle quilt as much as I loved making it.
Subscribe to:
Posts (Atom)