Showing posts with label dyeing. Show all posts

Thursday, June 5, 2014

Tissue Paper Dyed Silk Pillow

Here we decided to revisit our success as dying silk with tissue paper but this time use the technique to make a pillow. This is a super easy & quick no mess project that you can do on your own or with your little one.


I prepared a fabric pad to put our tissue paper on.  The pad is made up of:
18.5" x 18.5" square of cotton (this will be on the inside of the cushion so it doesn't matter what it looks like
18.5" x 18.5" square of batting (I used a scrap piece of wool batting for this project)
18.5" x 18.5" square of white cotton
18.5" x 18.5" square of silk (I took this from one of our silk scarfs we get from Dharma Trading)

Once the pillow is finished it will fit a 18" insert.

I kept all the layers together by running a zigzag stitch around the outside


I prepared a spray bottle with 1 part water & 1 part vinegar and cut up some strips of tissue paper.


We sprayed the pad to make it wet.


Bunny #1 laid down strips of tissue paper - any which way.


A little bit more spraying?


Once she had had enough of spraying & laying down the strips we put cling film over the top to stop it drying out & left it for a little while (couple of hours.)


The tissue paper made very vibrant colors on the silk & there was some interesting texture.After I had removed all the tissue paper I put the cushion top through the wash - cold wash and dried in the tumble dryer.


I tend to make pillowcase enclosure pillows as I am terrified of zips and I love a bit of ribbon. We also added some orange piping to the pillow to give it a bit of a zing.

Monday, November 25, 2013

Don't like it? Dye it.

My scrap bag runneth over. I don't want to throw anything away and yet I'm not happy with the majority of the materials & colors in there.

I recently watched Quilting & Dyeing Serendipity with Ana Buzzalino - a Quilting Arts Workshop which aired on PBS. After watching I could not wait to reach for a bottle of dye. Ana uses Procion Dyes to dye her work - I didn't have any to hand (yet!) so I reached for a bottle of Tulip Liquid Red dye that I had sitting in the back of my cupboard.


Procion Dyes are interesting as they only dye natural fibers. My bottle of Red Tulip Liquid dye is supposed to dye both natural and synthetic fabrics. I didn't know if this would affect the Sulky variegated rayon thread I had used to quilt little areas.

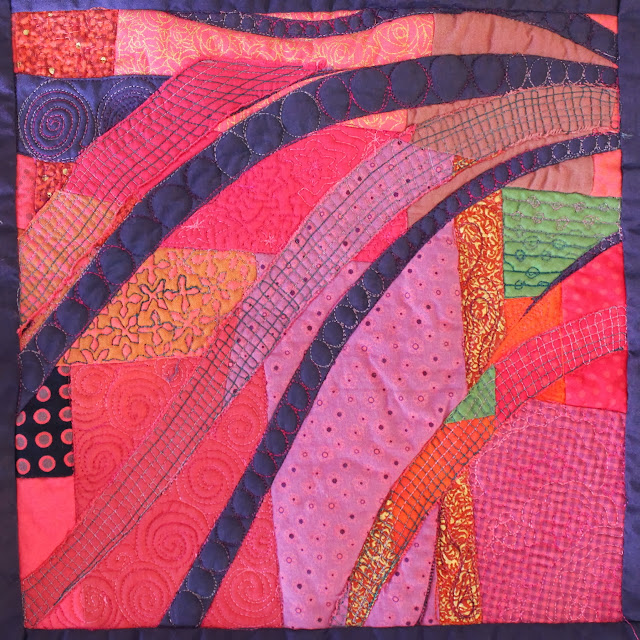
Time to put together something to experiment with. I literally threw some scraps together in a mad rush, cut into them and added some solid curves. Practised some free motion quilting.


Here is my piece before I dipped it into the red dye. I didn't like it when I jammed it together and I don't like it much better now - although the quilting certainly did add a little interest to it. I do however like how dyeing it makes all the colors blend much more. It evens out the color values/tone. I'm eager to take this experiment (the dyeing not the rushed random piecing!) to a larger piece.

The variegated thread did change a little but not too much - and who ever labeled the green fabric as cotton was telling very big porky pies indeed!


You can see my free motion quilting skills are coming along nicely.


I was so interested in Ana's workshop as it now gives me infinite possibilities when recycling clothes into quilts. I can't wait to see where this new technique takes me.

Wednesday, July 10, 2013

Kid Painted Teepee & Teepee Pattern


You can read about how we created the fabric to this Teepee here. The painting of this fabric was a LOT of fun.


To recap I used 3 2/3 yards (approx 11ft) of plain white 90" muslin - this is a nice weight of muslin - very white, close weave and not sheer.) But you could use anything for this project, old sheets, duvet covers, patchwork fabric together, blankets. Just about any material would make a cute teepee. Magic Cabin have some canvas teepee's ready to paint if you don't feel like sewing one together yourself.

I used:
- 3 2/3 yards of plain white 90" wide muslin
- BioColor paints with added fabric medium
- thread
- strips of cotton for borders (totally optional - I used approx 1 yard each in two different fabrics - total 2 yards)
- 6 x round wood 8ft poles - holes are drilled 11" from top
- ribbon scraps for ties inside teepee & window opening
- string to tie the teepee poles together (I wrapped one of our homemade play silks around the string to hide it and add more color)

Once I had laundered and dried our painted fabric I lay it out on the floor and cut out the following panels. The tops of the triangle panels are cut off so the top edge measures 3" and the bottom of your panel measures 42".


The two edge triangles will make your doors into the teepee. I'm sad that our door panels don't have a huge amount of paint on them. If I did this project again I might limit the color palette AND concentrate on getting the girls to paint the edges of the fabric more. A LOT of our painting action went on in the middle of the fabric.


I decided to frame my panels with additional bright material (selected by the small bunnies of course!) - but I must admit half way through adding the strips I wondered why I was doing it. Though I hope it adds something. It certainly adds heft and strength to the structure. I cut the strips at 1.75" wide and with the seams they now measure approx 1.25". I attached the strips using a straight stitch and then used a zig zag over the seams. In all I used up a little less than 2 additional yards of fabric from my stash just with the strips, door ties & window.


After I had sewn the panels together I also zigzagged down those seams too. I sadly discovered that using zigzag stitch liberally can use up a lot of thread! (eeeek) but oh how I have learned to love the zigzag - such an adaptable stitch - can be used for all sorts of purposes!

Once you have most of your seams together - apart from the two front panels. You should have something that looks like this.


This would be a good time to add any windows - should you want to enter into this madness. Our window is 12" square. I cut it 30" above the ground in the center of the panel.


I drew the lines first with water soluble pen. And attached some extra thick & strong interfacing that I found at JoAnn's (it is about the thickness of cardboard) around the 3 lines. Once I cut the flap I put a border around the flap. The border sticks out about 3/4" from the edge of the fabric. I used a fusible iron on adhesive to put all these bits together & then I sewed around the edges to prevent the fabric from fraying.


I also added additional ties to this panel of the teepee (four on each seam instead of three) so that the window panel would me a little more taut. Added some purple ribbon to tie the window up & voila.


A window (I was sternly told by my 4 year old that there should have been 7 windows. All the ribbon in this project - the window ties and the inside ties are made from ribbon I am still recycling from our Princess Tea Party!


The front two half triangle panels are sewn 1/3 of the way down from the top. I sewed a very thin seam on the inside with a straight stitch and then zigzagged down that stitch on the front side too.


Each panel seam has three ties on the inside of the teepee (apart from the aforementioned window panel that has four ties on the seams.) One at the top, middle and bottom. The door panels have tie backs that were sewed in at the same time as the side panel & door panel were sewn together. The tie backs are attached 1/3 of the way up the side seam.


The teepee also looks very colorful from inside.


No one can say that this teepee is boring.


I think Jackson Pollack would have certainly enjoyed having it in his yard.


I hope these notes help you put together a fun teepee of your own. 

Monday, July 1, 2013

Kid Painted Fabric


My eldest bunny told me that our recycled teepee was 'too boring'. It was 'too white'. So I suggested we should make another one and that she should paint the fabric with her sister.

I prepared 7 colors for painting our fabric. I used BioColor paint and added their fabric medium. I like BioColor because it is kid friendly and the colors are very vibrant. As I have mentioned before the only things that are kind of a drag about this product is that it stains clothes and you are supposed to leave the paint and fabric medium to dry for five days (patience is not a 4 year olds strong point!) I am also making a Kids Painted Quilt from the same fabric & paint.


I mixed the paints in old jam jars. I took outside a plastic bag to collect any messy painted trash, paper towels (for emergency mopping), disposable plates and I also prepared a bucket of soapy water.

Outside I lay some utility tables on the ground (covered in large black plastic bags) to create a hard flat surface and lay my fabric over the top. I used 2 1/3 yards (approx 10ft) of plain white 90" muslin - this is a nice weight of muslin - very white, close weave and not too sheer.)


I poured the paint into the disposable plates ...


... I put disposable diapers on both girls (they are both potty trained) so their big girl pants would not get ruined & stained and the neighbors would not be offended by total nakedness - as well as thinking I was a little bit cuckoo ... 


... let the decorating begin ...


... the girls only used their hands and feet ...


 ... there was a point where the cloth (in my opinion) looked so pretty - but the girls didn't want to stop so I felt like I had to let them continue until all the paint was used up ...


... they enjoyed flicking the plates, carrying them around, pouring paint straight from the jam jars.


Here is our finished piece of fabric. I left it outside for a couple of hours to dry a little and then I took it down to our basement where it will sit for 5 days while my four year old will ask every minute 'is it ready yet?'


Stay tuned for what will be a unique looking teepee!

Our other kid painted fabric projects this summer have included:
Kid painted Quilt #3 - Spraying Paint
Kid painted Quilt #4 - Shaving Foam Paint

***********

Please do not forget about the charity I Spy quilt - we are still looking for scrap fabric donations.