Showing posts with label pattern. Show all posts

Monday, December 1, 2014

Tutorial: Santa Sack

I wanted to revisit a tutorial that I made back in November 2011 for home made Santa Sacks.

I don't know what your Christmas was like as a child - but one of my highlights was the stocking. The arrival of Santa (Father Christmas) and the stocking was huge. The stocking was one of my father's thread bare socks (it was not at all attractive.) So when we had children I knew that the stocking was going to be one of my little Christmas obsessions.


I had made a few of these sacks back in 2011 - but only kept 2. I knew when bunny #3 came along we would have to make another sack. I know he will notice Christmas this year - he fully understands the concept of presents now. In fact I am unsure how we will restrain him.

This new sack came together really really quickly and if you shop at JoAnns for cheap fun stuff these sacks came be made very inexpensively. I love the sacks - they are so cute. The girls sacks have held up really well AND they can fit a surprising amount of bounty in them.

My little chap was very pleased with his sack but could not understand why I was shoving his toys into it and asking him to hold it while I took photos. 


His older sister - bunny #2 - was all too eager to stick her favorite toys in and pretend it was Christmas!


So if you feel like making some sacks this year - either to use as stockings like we do - or as just pretty gift sacks please remember my tutorial which you can find here - it seems to still make sense (to little me at least!)

Monday, May 5, 2014

Tutorial: Sixty Minute Split Strip Quilt

And try and say that in a hurry!


-->
Sixty Minute Strip Quilt 
(Top only  - twin size.)

Material needed for top:
~ 5 yards of different fabrics – cut into 5” width strips (making the strips wider gives the quilt a more modern bolder look)
~ or 35 x 5” WOF strips to make a scrappy version.


- Sew all your strips together into one big strip – mixing up the materials in random or in a pattern 

- Fold your long strip in two and sew along the right edge – when you reach the end/or fold – cut the bottom

-  Continue folding the strip and sewing along the right edge & snipping the bottom until you have 16 strips sewn together.  


- The width of your quilt so far should be approx. 72” - measure 72” up the quilt and cut straight across. You will have 1 x 72" square and 1 x rectangle approx 72" wide. 

- Turn the 72” square 90 degrees and sew the cut off strip back onto the square. 


- Baste & quilt your quilt. 


- Trim & square corners.


- I  added a cute pink ribbon & bow at the 72” seam point (as this was made for a 7 year old) – but you don’t need to do this.

- Bind your quilt. 

The sewing for this quilt top only took me a little under 60mins. It would be an easy last minute project to make in a night .

Friday, February 28, 2014

Tutorial: Continuous Cable Border

This tutorial has been a long time coming. My apologies. It was back in November 2009 when my first was just a little one when I first showed this continuous cable border and I used it again for my sisters wedding present in August 2012. I have received so many e-mails asking for the pattern. Here is the pattern that I will leave up for the month of March on the blog before putting a PDF version it in my Etsy store. If you would like a PDF version of the pattern e-mailed to you during March - please let me know.

I haven't done much hand knitting for a longtime. My little bunnies are SO fascinated by knitting needles and the wonder of throwing a ball of yarn around - I can't tell you how many times I accidentally left the knitting within arm reach of one of them and they pulled the needles out! You would have thought I would have learnt after the first occurrence of needle pulling - but apparently not!

Continuous Cable Border Pattern


SKILL LEVEL:  Intermediate to Advanced. Clear understanding of knitting cables.
Once you have this concept down it can be applied to any sized knitted panel.


MATERIALS:
For these pictures and for the purposes of demonstrating this pattern I used: Eco Wool - Vanilla (# 8014) from Cascade.
My swatches are 30 stitches across & 40 stitches down – I used my Ultimate Sweater machine to knit these squares. You can also make a practice swatch by hand knitting.

THIS PATTERN IS NOW AVAILABLE IN MY ETSY SHOP.

Wednesday, July 10, 2013

Kid Painted Teepee & Teepee Pattern


You can read about how we created the fabric to this Teepee here. The painting of this fabric was a LOT of fun.


To recap I used 3 2/3 yards (approx 11ft) of plain white 90" muslin - this is a nice weight of muslin - very white, close weave and not sheer.) But you could use anything for this project, old sheets, duvet covers, patchwork fabric together, blankets. Just about any material would make a cute teepee. Magic Cabin have some canvas teepee's ready to paint if you don't feel like sewing one together yourself.

I used:
- 3 2/3 yards of plain white 90" wide muslin
- BioColor paints with added fabric medium
- thread
- strips of cotton for borders (totally optional - I used approx 1 yard each in two different fabrics - total 2 yards)
- 6 x round wood 8ft poles - holes are drilled 11" from top
- ribbon scraps for ties inside teepee & window opening
- string to tie the teepee poles together (I wrapped one of our homemade play silks around the string to hide it and add more color)

Once I had laundered and dried our painted fabric I lay it out on the floor and cut out the following panels. The tops of the triangle panels are cut off so the top edge measures 3" and the bottom of your panel measures 42".


The two edge triangles will make your doors into the teepee. I'm sad that our door panels don't have a huge amount of paint on them. If I did this project again I might limit the color palette AND concentrate on getting the girls to paint the edges of the fabric more. A LOT of our painting action went on in the middle of the fabric.


I decided to frame my panels with additional bright material (selected by the small bunnies of course!) - but I must admit half way through adding the strips I wondered why I was doing it. Though I hope it adds something. It certainly adds heft and strength to the structure. I cut the strips at 1.75" wide and with the seams they now measure approx 1.25". I attached the strips using a straight stitch and then used a zig zag over the seams. In all I used up a little less than 2 additional yards of fabric from my stash just with the strips, door ties & window.


After I had sewn the panels together I also zigzagged down those seams too. I sadly discovered that using zigzag stitch liberally can use up a lot of thread! (eeeek) but oh how I have learned to love the zigzag - such an adaptable stitch - can be used for all sorts of purposes!

Once you have most of your seams together - apart from the two front panels. You should have something that looks like this.


This would be a good time to add any windows - should you want to enter into this madness. Our window is 12" square. I cut it 30" above the ground in the center of the panel.


I drew the lines first with water soluble pen. And attached some extra thick & strong interfacing that I found at JoAnn's (it is about the thickness of cardboard) around the 3 lines. Once I cut the flap I put a border around the flap. The border sticks out about 3/4" from the edge of the fabric. I used a fusible iron on adhesive to put all these bits together & then I sewed around the edges to prevent the fabric from fraying.


I also added additional ties to this panel of the teepee (four on each seam instead of three) so that the window panel would me a little more taut. Added some purple ribbon to tie the window up & voila.


A window (I was sternly told by my 4 year old that there should have been 7 windows. All the ribbon in this project - the window ties and the inside ties are made from ribbon I am still recycling from our Princess Tea Party!


The front two half triangle panels are sewn 1/3 of the way down from the top. I sewed a very thin seam on the inside with a straight stitch and then zigzagged down that stitch on the front side too.


Each panel seam has three ties on the inside of the teepee (apart from the aforementioned window panel that has four ties on the seams.) One at the top, middle and bottom. The door panels have tie backs that were sewed in at the same time as the side panel & door panel were sewn together. The tie backs are attached 1/3 of the way up the side seam.


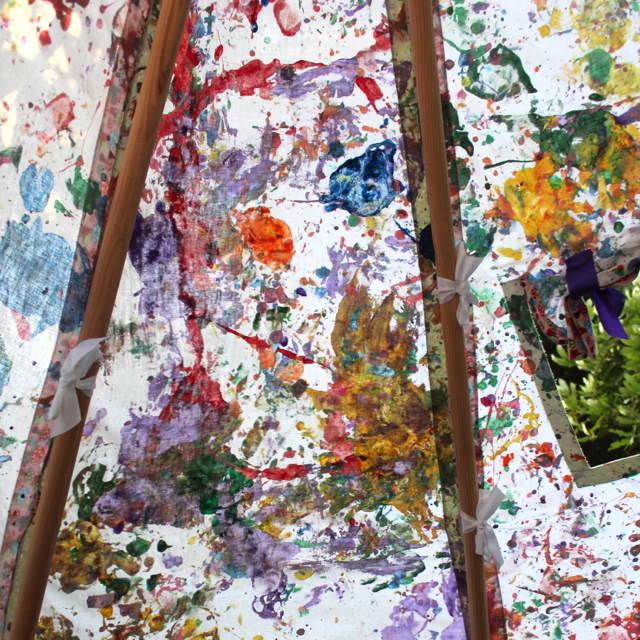
The teepee also looks very colorful from inside.


No one can say that this teepee is boring.


I think Jackson Pollack would have certainly enjoyed having it in his yard.


I hope these notes help you put together a fun teepee of your own. 

Monday, May 6, 2013

Cherry Blossom Tulle Pom Poms


We had a birthday party at the weekend so I made some tulle pom poms as a gift. They also reminded me of our cherry blossom tree outside they were so pink and full. I used 3 different colors of pink in the pom poms. They are so quick and easy to make - you can find the tutorial here.


I hope you had a fun and sunny weekend too.

Wednesday, March 27, 2013

Tutu Tutorial (Part 5): Basic Sewn Tutu

This is by far my favored method of making tutu's. The resulting tutu is clean, neat, crisp, fluffy and provides a blank canvas for such a wide variety of options and decorations.


You will need:
- 10 yards of 54” tulle - you can use a different width of tulle too - it will just result in a shorter tutu.
- cotton for sewing – the same color as your tulle.
- elastic (I used 1” non roll elastic – but any sort would work)
- a long blunt instrument for threading your elastic – I used a large crochet hook

1)  Prepare your tulle
Fold your tulle together once and then again so you have four layers of tulle. Pin the folded edges. You will sew along the edge that has the two folds. The other edge will have two edges and one fold. Because of the yardage of tulle folding the fabric can be a bit fiddly. I hang the tulle over the banister while I fold and pin.


It is important that your tulle layers lie flatly on top of each other and the folds are tight.


2) Sew your tulle layers together.
Sew a little over 1” down from the folds. Sew one straight line securing all four layers together down the entire 10 yards of tulle. I used a walking foot which helped prevent the tulle layers from slipping

OPTIONAL: Adorn your tulle.
Now is a the time to sew on ribbon, stick on gems or stuff your tulle with pom poms/petals etc Do these kinds of decorations BEFORE you insert the elastic. Once the elastic is inserted the tutu becomes so full it becomes tricky to work with.   

(I stuck gems to the tulle with a glue gun - practice first - those glue guns can make a mess!)

(I sewed ribbon to the entire length of one layer of tulle before inserting the elastic)
 
3)  Insert your elastic
Cut your elastic to your desired waist size (this chart might help you.) A blunt, easy to handle instrument is easiest to help you thread your elastic into the waist band. I impaled (literally) my elastic on a large crochet hook – and used that to thread the elastic through the gap on your waist band.


There is a lot of tulle here. Take your time threading the elastic in – you do not want to rip the tulle or loose the elastic half way through.


Sew the elastic firmly together. When I sew elastic together I like to sew the two ends together with a straight stitch first (forward & back once).


And then fold the seam over one way and secure again with a zigzag stitch (forward and back once).


I used the same color thread as the elastic (I used black thread on white elastic here for demonstration purposes only.)

5) Sew the back seam
Ensure all your tulle layers are flat when you sew the back seam together.


Once you have sewn all the layers together - trim neatly


OPTIONAL: Decorate your finished tutu


Add a bow to your waist band, sew on flowers or butterflies ...


... the final touches are endless.

UPDATE: I love seeing anything that my blog inspired you to make. Here is a tutu that Michele at MicMac' Bows made using this tutorial. This tutu was made for a 12mth old. So we adjusted the measurements.
For a shorter tutu for younger girls. 
- Purchase 5 yards of 54" tulle.
- Cut the 5 yards to 2 strips of 27" x 5 yards.
- Sewed the two lengths together into 1 strip of 27" x 10 yards.
- Then follow the tutorial to make a tutu that is approx 6.75" long & super cute.


Previous Tutu Tutorials: 

Wednesday, March 6, 2013

Tutu Tutorial (Part 4): Using Fabric Scraps - Tutu Ideas

This is less of a 'tutorial' and more of an ideas page of how you can use fabric scraps to make tutu's.

Recycled Shirt Tutu
Using the No Sew Crochet Elastic Tutu method I made this tutu. I had some strips of cotton left over from this fun project in 2008 (yes I keep scraps from that long ago!) - so I decided to make them into a little fabric tutu. I don't know it it reminds me of a little kilt or one of those raggy morris men outfits!


(Men's cotton shirts yield a lot of fabric that can be recycled into all sorts of things - you might remember I recycled lots of shirts into a quilt. We still have it - in fact is it now in our little boys room.)

Silk Tie Tutu
Using the No Sew Crochet Elastic Tutu method I made this tutu. The 1st layer is white tulle and the 2nd layer is re purposed white ties. Because of the size of knot that the ties make the ties are knotted on every other space in the crochet elastic. I used a binding stitch on the end of the tie pieces to try and minimize future fraying.


Previous Tutu Tutorials: No Sew Tulle Tutu
                                        No Sew Tutu with Crochet Elastic Ribbon
                                        Recycled Plastic Bag Tutu

Stay tuned for my next post: