Showing posts with label valentine. Show all posts

Wednesday, January 29, 2014

Candy Free Valentine Idea: Flower seeds

We can't seem to leave the idea of flowers behind for Valentines Day. This year our little Valentine tokens are again candy free.

We made little sacks out of burlap, tied at the top with red ribbon. The sacks are made from some burlap scraps I had - sewn together with a simple red zigzag stitch. They were very very easy and quick to make.


On each little sack is an appliqued red cotton heart.


On the label it says 'You are my sunshine'.


Can you guess what is inside?

SUNFLOWER SEEDS! What kid doesn't like watching a giant sunflower grow?


I had thought about making heart shaped seed bombs - but I was so worried about doing them wrong and harming the seeds - I didn't want to send out anything that wouldn't grow! I think we will experiment with seed bombs this summer.

You can read about our previous flowery themed valentine gifts here:
Valentine Egg Carton Flowers
Valentine Lollypop Flowers


Tuesday, December 31, 2013

Happy New Year - The End of our Tree Project

One of my favorite projects this year - and also for our family and to anyone how visits our house - has been our tree. Unfortunately just before Christmas due to the strength and persistence of our #3 bunny our Christmas tree had a nasty accident.

We only lost two ornaments and the stick snapped in several places. No small child was harmed in the accident - but we all felt a little sad.

We had all been stuck inside due to snow falling outside when the incident happened. Feeling a little sad we decided to rescue what we could of the now year long project. My eldest bunny really loves to use scissors so her paper snowflakes made a perfect decoration. The vase and branch is now on the kitchen counter - I don't put it past #3 to make it up there and demolish it some more - but so far it has stayed out of his reach.


Here is a little recap of our tree.


Wish you and your family a wonderful 2014 & thank you so much for reading.

Wednesday, March 20, 2013

Easter Tree

The ornaments from our Valentines Tree have been taken down and carefully stored for next year and my eldest has been busy at work decorating our now permissed Easter Tree!! You can read about how our tree came to life here. (But just to quickly recap this is a branch we found in our garden and the girls lovingly decorated it with glue and glitter. Our aim is to keep the tree up all year around and have the girls make crafts and decorations for it with a seasonal or holiday theme.) 


We made some cute hanging flower ornaments out of cupcake cases. 


I had found these sweet bright birds in Michaels. 


Paper eggs got covered with fluffy pom poms. 
 

We tied our colorful feathers to the end of the branches with bright green ribbon. 


What the kids see as they walk around and underneath it looks is pretty cool. 


We are all getting so much enjoyment from this branch we found in the garden. I can't wait to see how the tree develops and morphs over the coming year. 

Tuesday, February 12, 2013

Our Valentine Tree

I recently saw a picture of a Swedish Easter Tree and I fell in love. I have been planning to make one with the girls for Easter this year. Last weekend we had a lot of snow and we were a little house bound.

A week or so ago I had found a large branch in the garden for this project. I armed the little ones with paint brushes and glitter glue (1 part Elmers Glue, 1 part water, 3 parts glitter - you can get huge pots of glitter at Michael's.) I was amazed at the attention span that the girls had for this project. They painted the tree for at least an hour - which I thought was impressive for a 2 and nearly 4 year old.


My nearly 4 year old was so excited at the prospect of our Easter tree that when Daddy said we couldn't put up an Easter Tree up in February (ba-hum-bug) there were a lot of tears. I did feel for the little one - having painted the tree for an hour and then being told the tree would not be displayed until March - it did seem a little mean. So when Daddy finally gave in and said it could be a Valentine Tree - we could make valentines and hang them on the tree - and when Valentine's Day was over we could then turn it into an Easter Tree. The little one was made happy again.

We had SO much fun (2hrs straight - with a cookie break) making valentines to hang from the tree.


Perfect 5 minute mini projects for her - which involved a lot of glue, paper punches, scissors, gems, ribbon. She was in heaven - and I think the result looks really cute. I also made some mini tulle pom poms for her to hang too.


As with a Swedish Easter Tree we added feathers - but I glued them to ribbon and then tied them to a tree with a bow. This means we will be able to quickly change them when Easter comes along!


I'm usually a bit of a perfectionist when it comes to crafts - but I loved all the little trinkets my eldest made - with all their random imperfections. She will also be really excited to come home from school on Thursday and hang all the valentine cards she gets from class.


We put our tree into a tall vase filled with glass pebble and displayed it proudly in the middle of our coffee table.


So much fun was had - and it looks so good (the photos really do not do it justice) - that I plan to make this a seasonal tree - it will be with us all year (hear that Daddy?) and we will do seasonal projects and hang them on our tree - Easter will be next - then Summer, Fall, Halloween, Thanksgiving, Christmas .... can we think of anymore?

Daddy will be wishing he had just let us put up the Easter Tree in February.

Monday, February 11, 2013

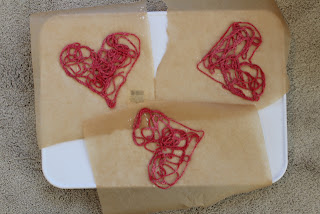
Valentine Yarn Hearts

I recently discovered a new blog - Aunt Peaches - and her entries really make me laugh. She has some great craft projects and her Yarn Hearts really caught my eye. I have lots of yarn and it seemed something easy that my littles could do with me. Here is another tutorial that uses corn starch for the glue:Spoonful: Warm Hearts, Sticky Hands.

This is so easy. I drew my hearts onto the greaseproof paper freehand. I used some red yarn we had floating around I used Elmers school glue (ratio of 1 part glue 2 parts water).


After we had had our fill of making the hearts we put them in our boiler room (the best place to dry crafts - especially paper mache) on a tray and waited for them to dry. 


Once dry we placed them on some card instead of hanging them up to make valentine cards. 


Wishing you all a Happy Valentines Day.

Wednesday, February 6, 2013

Tutorial: Valentine Egg Carton Flowers


I've been wracking my brain for cute ideas for valentines. Last year we made Lollypop Flowers. This year I decided not to make candy gifts - but how to package a little valentine something in a cute a crafty way? My brain seems to be stuck on flower crafts - this year we made our flowers from egg cartons.

You will need:
- paper egg carton
- green paint
- colored card or construction paper
- glue dots
- green pipe cleaners
- labels for your valentine messages (we made ours with a heart paper punch and added little bit of bling)
- scissors

1) Paint the cups on your egg carton green. We found it was easier to paint the carton before cutting it up.


2) Once the paint is dry cut the egg carton up so you are only left with the cups.


Make a hole in the bottom of each cup (I just pushed the closed scissor blades through the cup.)

3) Cut your heart petals.


Score the base of each petal by drawing a curve around a egg cup


Fold the scored line carefully and the petal should curve/fit nicely into the egg cup.


Make sure any pen line is on the underside of the flower or use a pen the same color as the card you are using.

4) Put a glue dot on the back of each petal and stick into your egg cup. (NOTE: The girls LOVE to glue - but glue dots help to keep the spread of glue under control. They also instantly stick - so no sliding or holding things together until the glue dries)


5) Wrap your little gift in a little bit of tulle or netting. Pull the netting through the hole in the egg cup - securing your little gift in the middle of the flower.


6) Bend your pipe cleaner into a leaf shape and thread your label on.


Wind the pipe cleaner tightly around the tulle + trim.


They do look cute - and you could adjust this idea and put lollypops in the middle of these flowers too. Or change the color of the petals - here is a yellow flower filled with potential Easter candy!


Next year I hope to give myself more time to come up with something outside of flowers!

There are hundreds of kid friendly crafts you can do with egg cartons. Just Google 'egg carton crafts' or 'egg carton flowers' and you will come up with a whole host of wonderful ideas.

Wednesday, February 1, 2012

Tutorial: Valentine Lollypop Flowers

I have been dying to make these Heart and Lollypop Flowers every since I purchased Martha Stewarts Homemade Holiday Crafts. Well Valentine's Day is nearly here and I thought they would be very cute for Bunny #1 to give to her class mates. Of course - I can never tackle a project without making some 'improvements' of my own. Here is my version of this project. I didn't know whether this post should be a 'pillaged but much improved idea from Martha Stewart' post or an honest tutorial. I'll let you be the judge! But here is what you will need:
- lollypop
- 5 paper hearts (mine measure a little over 2")
- 16 tissue paper hearts
- 2 leaf shapes
- paper punch or scissors
- hole punch

After cutting out/punching out your paper and tissue paper hearts put a hole punch in the base of each shape. Scrunch up the tissue paper hearts to give the tissue paper more body and carefully thread each heart onto the lolly pop stick - rotating the position of the hearts as you go until you have threaded all 16 tissue paper hearts. Fold your paper hearts in half and then fold the sides down again - to make little arrow/airplane hearts.Thread these onto your lollypop stick - rotating their position as you go.Cut out your leaf shapes and score a line down the middle of each leaf. This line does not need to be straight. Put a hole punch in the end of each leaf and thread onto the lollypop stick. A field of valentine lollypop flowers.I learnt my lesson with little fingers tugging apart the Candy Cane Mice and this time I have wrapped each lollypop flower in some cellophane, with some pink ribbon and a little heart gift tag.