Showing posts with label fabric paint. Show all posts

Wednesday, July 16, 2014

Kids Art Quilt: Sun Paintings

I have been working on the last Kids Spin Art Quilt and a quilt made with Bunny #1's first fabric line - I should really finish & quilt them .... and I can make all the excuses in the world to why we haven't completed them yet - but it seems a fact of life these days that my personal projects seem to take a back seat these days.

So like any insane person - I decided to add another project to my 'to be completed list'. This was a really fun & easy project to do with my young bunnies. I wish that I had taken more photos of the kids doing the project rather than the end results - but between fabric dye flying around, helping them cover the fabric, food stuffs being thrown everywhere & there being 3 of them and only one of me - it was a tad hectic - really fun but a wee bit hectic.


After painting the fabric and leaving the pieces in the sun for about 2+ hours (until they were completely dry) I put them through the hottest cycle in the tumble dryer, washed them in a warm wash and dried them again on the hottest setting in the tumble dryer.

What we used:
  • Setacolor Transparent Paints (diluted approx 1 part paint to 1 part water)
  • Brushes & paint cups
  • White Cotton
  • Random selection of things from the house - pasta, cereal, oats, rice, plastic lids, cardboard stencils, glass pebbles etc
We laid out our cotton fabric on damp plastic tables in the shade (it is important you are not in the sun for the painting bit.) The fabric stuck nice & flat on the wet tables. After we had finished the project the tables were a bit of a mess - most of the color came out with a bit of soft scrub. If we do think again (which we surely will) I will be mounting the fabric to cardboard so they are easier to carry & the cardboard can be discarded after they have been finished with. 


Bunny #2 (3 years old) got bored trying to cover all the fabric on her own - she really needed help to cover all the fabric. But when she says she is done there isn't much you can do to change her mind. So her first painting was 'mostly' purple and then she emptied a ton of rice onto it.

BEFORE


AFTER


Bunny #1 needed help to cover the fabric too but was fully into the decorating the fabric. Her first piece of fabric we used a heart cardboard stencil in the center and plastic lids to make circles.

BEFORE


I think we might have diluted her paint too much as her spots are not as bright as I would have liked them to be.

AFTER


This is the only one I painted. Pink with yellow spots and the kids threw swirly pasta all over it.

BEFORE


Looking at the results - Bunny #2 has the right approach - more decorating is better. 

AFTER


Then we decided to paint some stories.  Bunny#1 painted a beach, sea & sunset. She used a cardboard stencil for the sun, piles of oats for the clouds, spaghetti for seaweed, more oats for sand and glass pebbles for stones.

BEFORE


AFTER


Bunny #2 is really into mermaids so she painted a sea & sunset - she actually poured the yellow color on. We didn't have a mermaid stencil so she settled on a dolphin and a fish, glass pebbles for rocks and piles of oats for clouds. 

BEFORE


AFTER


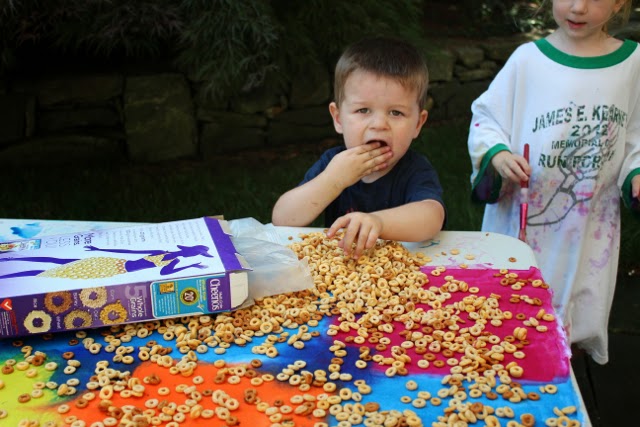
Here is Bunny #3 helping to distribute some cheerios over the a piece of cotton painted in blocks of different colors. (I really wouldn't suggest allowing your kids to eat Cheerios off of fabric paint.)

BEFORE


AFTER


And Bunny #1's final art work of a rainbow, sun & clouds. She was very definite that there should only be two pasta bows - one for the sun & one for the rainbow - the clouds are made from piles of oats again.

BEFORE


AFTER


I'm going to make 2 quilts one of each of the girls out of these prints - want to know what the quilts will look like? Stay tuned!

Tuesday, August 20, 2013

Kid Painted Garden Picnic Blanket

I am very excited that this post is being featured at Make it Handmade.


My girls love anything that involves copious amounts of glue and spray bottles. This project held their attention for 1+ hours - which I think must be a record for us!


For this project I used:
- a piece of plain white muslin/cotton
- a bottle of Batik EZ (you might be able to substitute this with a liquid washable glue like Elmers) I poured the Batik-EZ onto a craft tray - but I think you could use any vessel as long as you can dip your leaves into
- cotton balls
- spray bottles
- fabric paint - I use BioColor paint with their BioColor Fabric medium - it is non toxic and certainly works!
- leaves & flowers from around the garden
- plastic sheet - I just used a large black bin liner cut down one side to protect our patio
- additional fabric for the border, backing & binding
- batting

The girls were told to dip things into the Batik EZ and then place them on the fabric. Our aim (I say 'our aim' but really is was 'my aim') was to make a sky with clouds in the middle and leaf prints and grass on the outer edges.

Putting the cotton balls apparently was boring and the girls wanted to move on to cutting leaves off plants and sticking them down asap. Once they had finished with the cotton balls I just emptied the remaining balls from the bag into the middle of the fabric - no additional Batik EZ.


There was some consideration to where every leaf or flower should be put.


Find a leaf, dip and stick. They didn't seem to tire of it. 


Everything was precisely placed.


Here is our finished fabric after the cotton balls & leaves were all stuck down and they declared the project to be 'done'.


What they didn't realize was that after lunch - once everything had dried we got to spray everything. I used four colors - two green tones & two blue tones - I also watered down the BioColor Paint & Fabric Medium combo so the paint would be lighter.


My four year old was good at following the 'blue in the middle for sky' & 'green around the outside for grass' instructions. But my 2 year old just sprayed what ever and where ever she fancied. 


Here is our fabric after the spray paint. We left it to dry in the sun & then I moved it into our boiler room where it sat for 5 days - just to make sure.


To remove all the leaves and cotton balls I just soaked the fabric in cold water. Everything came off very easily - but the waxy coated leaves (Ivy & Lillies leaves) came off the easiest. I put the fabric into the washing machine and ran it on a hot cycle & tumble dried it on a hot cycle too.


Once I had added a simple border to the fabric I layered, quilted & bound the picnic blanket.


I don't think you need to quilt your picnic blanket like I did - you could tie it if that is easier. If your children are older you could also get them to outline the leaf shapes with a fabric marker. There are many ways you could take this idea.


The girls LOVED having a fairy tea party in the garden with their new picnic mat.


You can tell these kids are somewhat English by their tea party skills!


After the tea party was over the girls set about inspecting the clouds & leaves on the blanket.


Our other kid painted fabric projects this summer have included:
Kid painted Quilt #3 - Spraying Paint
Kid painted Quilt #4 - Shaving Foam Rainbow Paint

***********

Please do not forget about the charity I Spy quilt - we are still looking for scrap fabric donations.  

Friday, August 2, 2013

Quilting Batik (well kind of)

I remember doing batik as a young school girl and I wanted to try the wax version for this experiment - but I have very little time available to me, the fact that hot wax and little people didn't seem a good idea - I decided to try Batik-EZ to see how this idea would turn out.


This idea came to me and for the purpose of my experiment I used a coloring page that bunny#1 had got from her ballet class.


I placed a piece of white fabric over my finished design (minorly added & adjusted with a sharpie) and I set to work with my batik-ez tube of goodness.


I used a toothpick dipped in the goop to trace the line. A paint brush was just too thick. The Batik-EZ spreads across the fabric quite a bit.

After I had traced all the lines and left them to dry I used fabric paint (Jacquard Products Textile-Color Exciter Pack) to color in my picture. This paint was so easy to use - it was like water color for fabric - add more water to make lighter colors - I just thought it was a very flexible and easy to use product.

Once the paint had dried I washed & dried the fabric & went to work practicing my free motion quilting with my new BSR foot. We are still not firm friends - but our relationship is slowly getting more friendly.


I used a heart/vine quilting pattern.

My eldest bunny LOVES this so I think I will have to finish it off into a cushion in fabrics to complement her own painted quilt or make her a special bag for her ballet gear.

I also tried a brighter ocean picture out - which was cute too. Beach bag perhaps?


I have way too many ideas for making a full sized quilts in this way.