Tuesday, July 16, 2013

Kid Painted Quilt - Blotter Art

I managed to finish the quilt that Bunny #1 painted the blocks for. To recap this is how she painted each block herself. 


When I had finished the quilt I prepared her bed and took her upstairs. She was very excited - can you tell? 


The fabric I used is from Michael Miller's Fairy Frost line. I used 1 yard each of Dusty Rose, Orchid, Glitz Petal Pink & Azalea. The material is just perfect for a little girl who loves pink & purple. The glitter & shimmer in the fabrics is just fabulous. If I had endless supplies of cash I would be buying up the whole range. The backing is pink & swirly wide quilt backing.

Remember she wanted fancy pillows? I think they look like butterflies.


The pillows have a fancy frill & fancy border - I used the same sort of technique used when making a cathedral patchwork block - but I sewed down the curves down. Here you can see the pretty shimmer in the fabrics.


In the center of the quilt I joined two blocks together to make longer mirrored blocks.


In some ways I am quite glad Bunny #1 went to wild with paint - if we hadn't have had to blot up the gloo-globs of paint with a another square of fabric we wouldn't have such symmetry.


I have recently invested in a BSR foot. And I am having a bit of a love hate relationship with it (more hate really.) I am just so glad this quilt is for my daughter and not someone else. I used a flower pattern with a swirl inside as the stippling design. 20 minutes in I knew this was a bad move - but it was too late - I had to push on and finish.


The quilt measures under a technical twin quilt size - but it still fits nicely on her bed.


The little princess was a very happy girl. 


Things I would do differently next time - I would make the fabric squares she painted smaller and I would perhaps try and more complicated design/framing of the blocks. I would also like to make friends with that BSR foot ..........

Our other kid painted fabric projects this summer have included:
Kid painted Quilt #3 - Spraying Paint
Kid painted Quilt #4 - Shaving Foam Paint

***********

Please do not forget about the charity I Spy quilt - we are still looking for scrap fabric donations. 

Wednesday, July 10, 2013

Kid Painted Teepee & Teepee Pattern


You can read about how we created the fabric to this Teepee here. The painting of this fabric was a LOT of fun.


To recap I used 3 2/3 yards (approx 11ft) of plain white 90" muslin - this is a nice weight of muslin - very white, close weave and not sheer.) But you could use anything for this project, old sheets, duvet covers, patchwork fabric together, blankets. Just about any material would make a cute teepee. Magic Cabin have some canvas teepee's ready to paint if you don't feel like sewing one together yourself.

I used:
- 3 2/3 yards of plain white 90" wide muslin
- BioColor paints with added fabric medium
- thread
- strips of cotton for borders (totally optional - I used approx 1 yard each in two different fabrics - total 2 yards)
- 6 x round wood 8ft poles - holes are drilled 11" from top
- ribbon scraps for ties inside teepee & window opening
- string to tie the teepee poles together (I wrapped one of our homemade play silks around the string to hide it and add more color)

Once I had laundered and dried our painted fabric I lay it out on the floor and cut out the following panels. The tops of the triangle panels are cut off so the top edge measures 3" and the bottom of your panel measures 42".


The two edge triangles will make your doors into the teepee. I'm sad that our door panels don't have a huge amount of paint on them. If I did this project again I might limit the color palette AND concentrate on getting the girls to paint the edges of the fabric more. A LOT of our painting action went on in the middle of the fabric.


I decided to frame my panels with additional bright material (selected by the small bunnies of course!) - but I must admit half way through adding the strips I wondered why I was doing it. Though I hope it adds something. It certainly adds heft and strength to the structure. I cut the strips at 1.75" wide and with the seams they now measure approx 1.25". I attached the strips using a straight stitch and then used a zig zag over the seams. In all I used up a little less than 2 additional yards of fabric from my stash just with the strips, door ties & window.


After I had sewn the panels together I also zigzagged down those seams too. I sadly discovered that using zigzag stitch liberally can use up a lot of thread! (eeeek) but oh how I have learned to love the zigzag - such an adaptable stitch - can be used for all sorts of purposes!

Once you have most of your seams together - apart from the two front panels. You should have something that looks like this.


This would be a good time to add any windows - should you want to enter into this madness. Our window is 12" square. I cut it 30" above the ground in the center of the panel.


I drew the lines first with water soluble pen. And attached some extra thick & strong interfacing that I found at JoAnn's (it is about the thickness of cardboard) around the 3 lines. Once I cut the flap I put a border around the flap. The border sticks out about 3/4" from the edge of the fabric. I used a fusible iron on adhesive to put all these bits together & then I sewed around the edges to prevent the fabric from fraying.


I also added additional ties to this panel of the teepee (four on each seam instead of three) so that the window panel would me a little more taut. Added some purple ribbon to tie the window up & voila.


A window (I was sternly told by my 4 year old that there should have been 7 windows. All the ribbon in this project - the window ties and the inside ties are made from ribbon I am still recycling from our Princess Tea Party!


The front two half triangle panels are sewn 1/3 of the way down from the top. I sewed a very thin seam on the inside with a straight stitch and then zigzagged down that stitch on the front side too.


Each panel seam has three ties on the inside of the teepee (apart from the aforementioned window panel that has four ties on the seams.) One at the top, middle and bottom. The door panels have tie backs that were sewed in at the same time as the side panel & door panel were sewn together. The tie backs are attached 1/3 of the way up the side seam.


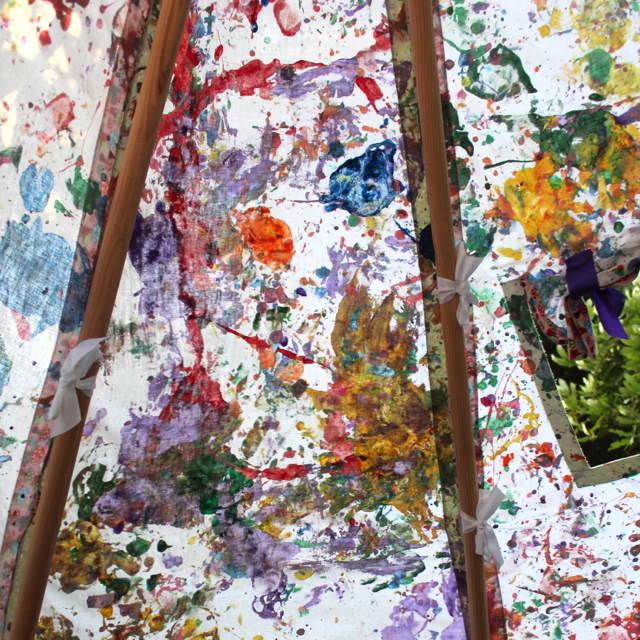
The teepee also looks very colorful from inside.


No one can say that this teepee is boring.


I think Jackson Pollack would have certainly enjoyed having it in his yard.


I hope these notes help you put together a fun teepee of your own. 

Friday, July 5, 2013

WIP: Kid Painted Quilt - Blotter Art

We are in the midst of our summer holidays and I'm trying to find activities which involve my kids and that I find interesting - namely creating things! I had this idea to create a series of fabric paintings with my eldest which I would then sew together to make her a quilt that she had co-created.

I have recently invested in a couple of gallons of BioColor and the BioColor Fabric Medium. BioColor does some really cool stuff. But most of all I like it because it is non toxic and the colors are extremely vibrant. It does not however wash out of clothes - in fact it stains badly - so I was quite confident - mixed with the additional fabric medium - it would be a great thing to use for this project. 

She chose her colors - pink and purple. Why does that surprise me? I mixed the following 5 hues. I also added some 'Make it Shimmer' to the dark pink and purple colors.


We are all prepared. Squares (12"x12") of white muslin (I really like the weight and quality of this muslin) on top of waxed paper. The paint is in what Discount School Supply call 'Nancy Bottles'. My girls LOVE squeezing the paint out of them - but gosh can they make a mess with them!


We start to squeeze - our first square is very neat. 


We fold the fabric over and squish. 


Open it up - our first square completed! 


Then we start getting crazy and spreading paint everywhere .... 


... which leads to this.


Squiggles?


Splatty dots? 


There was WAY too much paint being thrown around and the fabric couldn't absorb nearly anywhere enough of the paint. So we changed our strategy. I made an outline to try and contain the spread of paint and once we had folded and splatted we put another square on top of the 'painting' and made a copy.


This worked really really well and gave us two matching copies of each square she made. I also felt having multiples of each 'painting' would be good for making a quilt design.


After reading the instructions (after the painting was over!) I read that the paint had to be left to dry for 5 days - which for an impatient four year old was a daunting wait. I will launder, dry and iron all the squares before putting the quilt together. Bunny #1 is already very proud of her 'blanket. She has also demanded a matching 'fancy pillow' with ruffles .......

Update: You can see how this quilt turned out here http://rachaelrabbit.blogspot.com/2013/07/kid-painted-quilt.html 

Our other kid painted fabric projects this summer have included:
Kid painted Quilt #3 - Spraying Paint
Kid painted Quilt #4 - Shaving Foam Paint

Monday, July 1, 2013

Kid Painted Fabric


My eldest bunny told me that our recycled teepee was 'too boring'. It was 'too white'. So I suggested we should make another one and that she should paint the fabric with her sister.

I prepared 7 colors for painting our fabric. I used BioColor paint and added their fabric medium. I like BioColor because it is kid friendly and the colors are very vibrant. As I have mentioned before the only things that are kind of a drag about this product is that it stains clothes and you are supposed to leave the paint and fabric medium to dry for five days (patience is not a 4 year olds strong point!) I am also making a Kids Painted Quilt from the same fabric & paint.


I mixed the paints in old jam jars. I took outside a plastic bag to collect any messy painted trash, paper towels (for emergency mopping), disposable plates and I also prepared a bucket of soapy water.

Outside I lay some utility tables on the ground (covered in large black plastic bags) to create a hard flat surface and lay my fabric over the top. I used 2 1/3 yards (approx 10ft) of plain white 90" muslin - this is a nice weight of muslin - very white, close weave and not too sheer.)


I poured the paint into the disposable plates ...


... I put disposable diapers on both girls (they are both potty trained) so their big girl pants would not get ruined & stained and the neighbors would not be offended by total nakedness - as well as thinking I was a little bit cuckoo ... 


... let the decorating begin ...


... the girls only used their hands and feet ...


 ... there was a point where the cloth (in my opinion) looked so pretty - but the girls didn't want to stop so I felt like I had to let them continue until all the paint was used up ...


... they enjoyed flicking the plates, carrying them around, pouring paint straight from the jam jars.


Here is our finished piece of fabric. I left it outside for a couple of hours to dry a little and then I took it down to our basement where it will sit for 5 days while my four year old will ask every minute 'is it ready yet?'


Stay tuned for what will be a unique looking teepee!

Our other kid painted fabric projects this summer have included:
Kid painted Quilt #3 - Spraying Paint
Kid painted Quilt #4 - Shaving Foam Paint

***********

Please do not forget about the charity I Spy quilt - we are still looking for scrap fabric donations.