Saturday, June 6, 2015

Teacher Appreciation Gift: Kids Art Quilt

I can't believe it is that time of the year again - my two smallest bunnies have finished their year at nursery school and it was time to think about teacher appreciation gifts again. (On a small Mummy note I am struggling with how fast these little people grow up and how I long to have more - oh dear husband of mine are you reading this???)

I have wanted to make a little art gallery quilt for a longtime now and this was the perfect opportunity. (I find giving gifts is a great way to try out a new idea!) Each child's parent in the class gave me their favorite piece of art work - we have had some really great/fun art work come home this year.


I scanned each piece of art work and enlarged them so they were all of a similar size. I printed the artwork onto a yard of fabric using Spoonflower. I added a simple 'frame' to each picture as well as the artists name.

  
I wanted the background fabric to look like wallpaper as though the art was hanging on a wall. I tried very hard to get the seam to match perfectly so you can't see the seam. Can you see the seam? (and yes I was quietly proud of this moment in my sewing history.)


Part of what I love most about these gifts is the labels. I took the class photo and made it into a label. I use printable paper and our home printer to make the labels - you heat set the ink with an iron (it does fade a little with washing) but it does the job well. 


I did some very simple quilting on the quilt. Double loop the loops on the background and a little bit of quilting on the art.  You can see the detail of the quilting much clearer from the back.


Another year has dashed past. Thank you to all the teachers out there that bring joy, laughter and learning to our little bunnies on a daily basis.


If you remember for the past two years we have made hand print pillows that were mighty cute too - you can check those out here Teacher Appreciation Hand Print Pillows (2014) & Teacher Appreciation Hand Print Pillows (2013).


I have another teacher appreciation quilt in the works - its a really great quilt so stay tuned I will be able to share that with you soon too. 

Tuesday, May 19, 2015

Memory Quilt: Graduation Quilt / T-shirt Quilt

There is a lady in our village who I like and admire very much and when she asked me to make a quilt for her son from all of his sports jersey's to celebrate his graduation this May - I could not say no.

The ENTIRE quilt (top and back) is made from the t-shirts and uniforms I was given.


The silver lines are made from his football shorts. The binding is made from his lacrosse shorts.


I took a Yale logo of a very very loved (sweat stained cut off t-shirt) - added it to the quilt ...


... and then turned the remaining material from said overloved t-shirt into a pillow.


I wanted to make a quilt that wasn't a typical t-shirts quilt. I channeled my inner 22 year old male and with the help of my dear husband (who told me if my ideas were too 'patchworky' or 'that could work' or silence which meant no too) I came up with this design.


I tried to keep the quilting motives bigger than I usually do and more masculine. I achieved on bigger but somehow some swirls got in there. Think torrid manly water not pretty swirls.


I quilted flames for the first time (which was kind of liberating!)


No bubbles here - just manly rocks (pebbles). 


Imagine my horror when I presented the quilt only to learn I had missed out one important detail. Being rather English and female I am not accustomed to the difference between sport uniforms and I had unfortunately assumed (due to the material) that the lacrosse shirts and football shirts were the same team/sport. That will teach me to not quadruple check. I seriously hate getting things wrong - I can't tell you how much I check my notes and check them again before cutting, before sewing, before quilting. In fact I'm probably way too uptight about the process!!

I can not tell you how gracious the lady was about the mistake and after we talked we came up with a solution. Can you spot the difference?


I wrapped the quilt in one of his baseball uniform belts.


"If your uniform isn't dirty, you haven't been in the game." (Ben Bernanke)

Monday, April 27, 2015

Portrait Quilt

I'm really struggling with blogging at the moment - I hear others say the same - but it really is a time sucking sport. I seem to have a lot of quilt requests at the moment which makes me more than aware of the time I'm spending away from my ever 'speeding to adult hood' little bunnies. This quilt however really deserves a little narrative.


I never thought I wanted children. Children plain scared me. When I fell pregnant with my first child I was petrified. I remember crying in check ups. The ultrasound pictures scared me. I remember standing in prenatal yoga and being asked to touch my belly and 'be at one' with my unborn child - to feel lucky - I didn't feel lucky I felt purely petrified. I barely made it through prenatal classes - in fact I turned to my husband at one point and said 'if I have to watch one more video I'm going to cry'. I didn't know what it was to have a child. I didn't know how it felt. I didn't know that the moment I saw her that I would fall so deeply in love that the past 9 months of petrification would melt away into pure awe. I didn't know that having her would be so much, mean so much. Since this little bundle arrived I've become addicted to the little people. I have 3 beautiful children whom I couldn't adore more - despite their tantrums and their insistence that my cooking is 'yuck'. I'd love to have more (i.e. read 'begged until all dignity is gone) but my husband insists that that shop is now shut!


So finishing this quilt which I have been saving the pajamas for for 6 years now (although I have only used the first 3 years of pj's in this one) marks something for me. Love - for sure - but also a strange confidence that I finally found to know that I could cut up theses precious things and do them justice. And sadly due to my mean husband that there will be no more little people coming along to dress in these cute clothes.

Can you spot Tinkerbell?

There was some distress from Bunny#2 when she saw her favorite Ariel Pj's had been included!

A huge thank you to my hugely talented friend Luke Haynes who taught me how to construct portrait quilts.


A huge thank you to my new equally as talented friend Karen McTavish who told me 'don't not do something just because you are scared' ... I will be taking that mantra to my grave.

And a big thank you to Michelle Jackson who's wonderful work I fist saw in my favorite Machine Quilting Unlimited and she showed me a different way to quilt portraits with tiny bubbles. I love the effect Michelle - thank you!!


I love this quilt.

And I love this little girl.

Tuesday, April 14, 2015

Kids Art Quilt: Marbling Fabric

I have wanted to do marbling with the kids for a long time. With the endless winter weather we have found ourselves inside with a lot of time to fill

I purchased a Jacquard Marbling kit from Amazon. (As you will read this was a bit of a waste of money and a frustrating process.) We also used fabric paint from Jacquard - that I love. Really bright vibrant colors. We dropped the colors straight from the bottles.

For all our marbling I gave the girls disposable chop sticks that we ran through the mixture. We experimented with straight lines and swirly lines. 

Jacquard Marbling Kit (Methocel)
It took a long time to prepare - 45 mins+ which was not practical as the little people were keen and waiting to start. The methocel mix did not work without the suggested addition ammonia - a tatty addendum to the instructions was stuck in the box suggests adding ammonia if the methocel doesn't work properly. I didn't want to add ammonia - perhaps I'm a whimp but ammonia and kids 5 and under didn't sit well with me. It was a bit of a disaster. And yes I did get a little cross after trying this process 3 times!!! The paint in the kit was way too thick too and the girls got very frustrated trying to get the paint out.


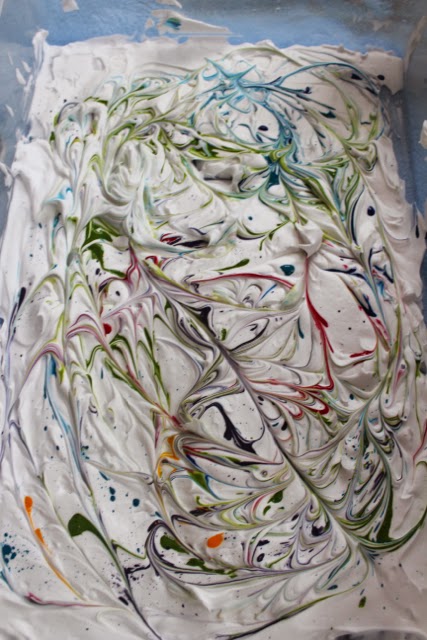
Shaving Foam & Fabric Paint
Spray in shaving foam into a flat pan add drops of paint on the top and mix.  The girls LOVED spraying the shaving foam - that was the highlight for sure. We got better 'marbling' when the shaving foam had some water added to it. But all the finished colors were very light.


Liquid Starch & Fabric Paint
This worked really well. The paint dispersed and looked amazing. But I think the liquid starch perhaps diluted the paint a little and the fabric paint washed out more than I would have liked. 


Fabric before heat setting and washing (above) and after (below)


Cornstarch & Fabric Paint
Amazing what cornstarch can be used for - but this was my favorite method for marbling by far. The girls loved mixing it. It suspended the paint well & looked amazing. It gave us the strongest color on the fabric.


Fabric before heat setting and washing (above) and after (below)


Once the fabrics were heat set,  washed and ironed the colors did dampen a little -  but I think they will be fun to work with - now I just have to figure out a design idea!